Sections
Overhauling A Contax I Shutter
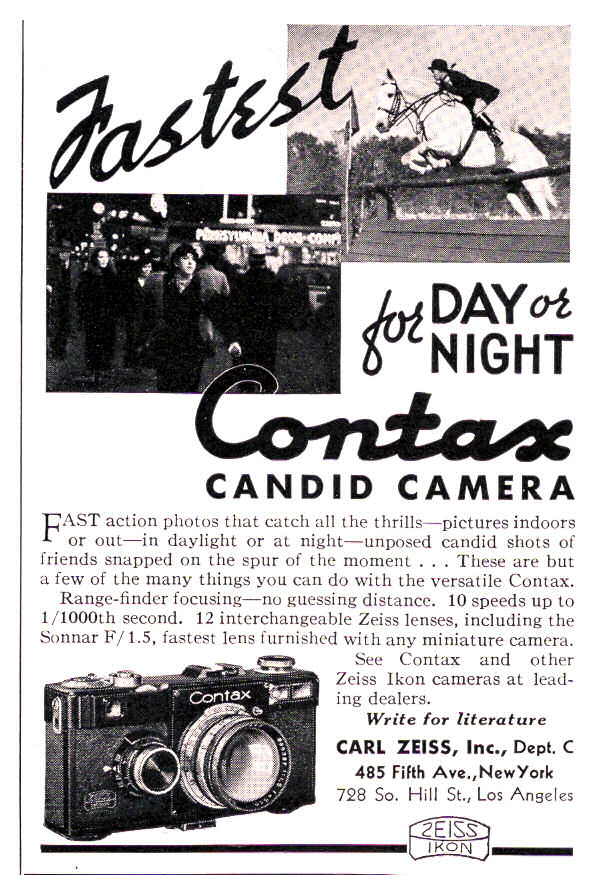
A 1936 Photography Camera Magazine Advertisement for the Contax I
Before You Buy A Contax I Keep This In Mind
Zess put the paint on the Contax I very thick. It's about three times as thick as the paint on the other Contax models.. Then, when the serial numbers, arrow, shutter speeds and anything else was engraved onto the body it was engraved through the paint. In all other cameras I've seen, including the other Contax models, the practice was to engrave then paint. It is usual to make the engraving deep enough into the metal so that a layer of paint won't affect the engraving when it is filled with it's paint. But on the Contax I, the process was reversed. The paint on the Contax I is so thick that if it is removed or damaged the remaining engraving into the underlying metal is too shallow to be able to withstand being painted over and it's not deep enough to hold replacement fill paint. If the body is repainted the paint will simply completely cover the engraving. It isn't possible to deepen the engraving and so if the camera has bad paint in the vicinity of the engraving the problem is not correctable for now. So if you're buying a Contax I to show or display, or if it's appearance is very important to you, examine it very carefully to make certain that the paint in the vicinity of the engravings is as good as you want it to be because it's not possible now to make it any better than it is.
How Many Contax I Versions Are There?
Inside all the variants of the Contax I I've seen many variations. Zeiss was constantly tinkering with the design to improve it. The fact that from external examination alone eight variations ( 1a1, 1a2, 1b, 1c, 1d, 1e, 1f, 1g) have been identified demonstrates that this camera was in a state of constant improvement.
Internally the most common difference to be found within identical models is the material and construction of the shutter curtains. I've identified three materials and these are steel (very rare), aluminum (fairly common) and brass (fairly rare). Also, there are two types of lower shutter curtains. One has small steel spring fingers attached with rivets to the inside of the upper lip of the lower shutter curtain to assist in curtain latching, and the other type does not have these small springs.
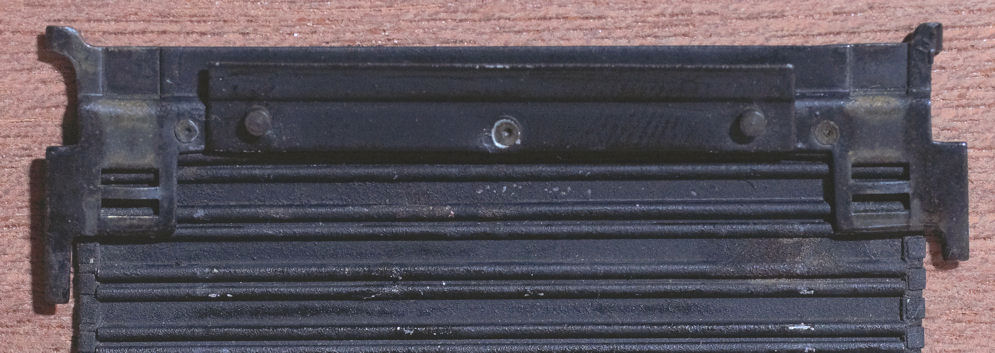
This is a picture of a curtain without the springs. It is also a very rare steel curtain from a very early Contax IA and if you look closely you can see some small patches of rust:
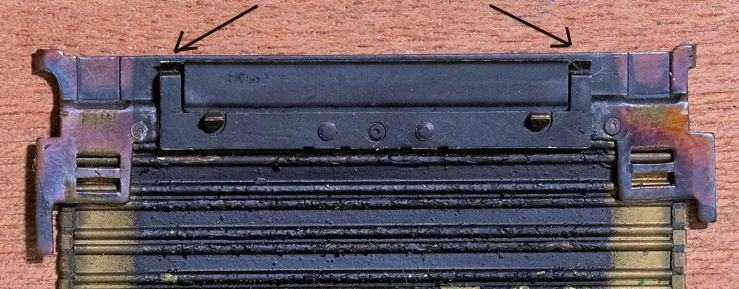
This is a picture of the back side of the brasslower curtain upper lip from a Contax IG. The arrows point out little steel grasping fingers that have been provided to assist with shutter curtain latching. The fingers fit over the hinge ridges in the upper curtain and help to hold the two curtains together. These fingers are very fragile and can easily be bent or damaged if the shutter curtain springs are excessively tightened. You can also see that the curtain is riveted together. This makes repairs very difficult.
If you would like to have a look at the Chrome Faced Contax IF please use this link:
In this article you will also find a newly identified variant of the Contax I rigid 50mm f2.0 Sonnar lens..
The Contax IA through IC are fairly standard and the characterization of them as being discrete versions based on exterior cosmetics is fairly secure. It's in the later versions that things get more complicated. This is because Zeiss began to sell Contax ID though IG models with both aluminum and brass shutter curtains. The curtains are painted black, so for the most part they look the same, but brass curtains have shutter tape attachment points and are otherwise much stronger than aluminum. The brass curtains hold up much better over time than do the aluminum ones and they survive inexpert repair work and withstand incorrect shutter tape much better. My thinking is that the brass and aluminum curtain versions constitute a separate sub classification allowing for the Contax ID1 and ID2, and so on through the IG, with 1 for aluminum and 2 for brass.
There is a variant of the Contax ID in which the Contax IC rangefinder and lens mount module was used. I haven't seen enough Contax ID's to know whether this is a repair shop modification or a factory substitution.
Then there are the very rare chromed front plate models. I have seen three of these, all from Europe. One was sent to me by the original purchaser and the others came from the sons of the original purchaser. I was told that both were as they came out of the box from the dealer. Clearly, at one time or another, Zeiss manufactured some Contax IG's with chrome instead of black enamel plated face plates.
The Contax Ia, b, c, d and e Rangefinder and its Mirrors:
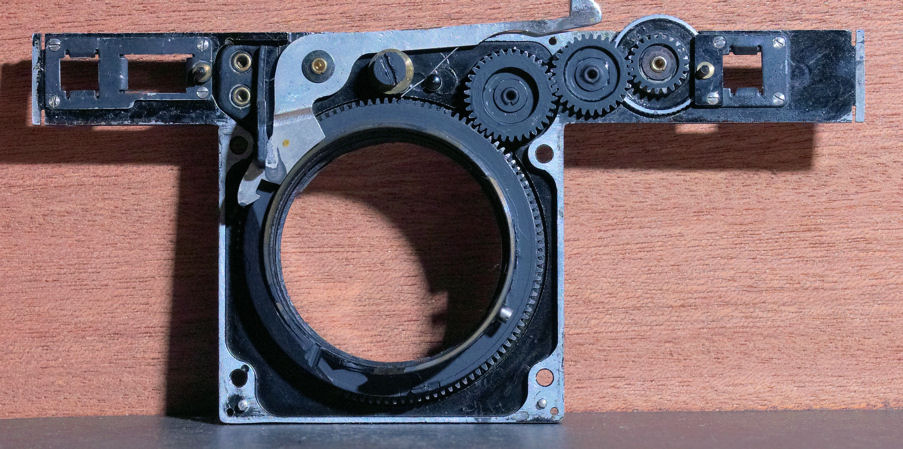
Five models of the Contax I, the Contax Ia, Ib, Ic, Id and Ie, have the same rangefinder. It is a moving mirror type and the mirror is actuated by a lever that contacts the back of the focusing helical. The back of the focusing helical acts as a cam that rotates the mirror around a pivot as the lens mount rotates. This is a picture of the back of a Contax Ia front plate showing everything but the rangefinder. The rangefinder is normally held in place by the large black screw in the top middle of this assembly:
With this system the rangefinder contains two mirrors, one is a moving front surface silver mirror and the other is a stationary front surface half silvered mirror. The silver on these mirrors tends to seriously deteriorate with time and with bad storage conditions. The silver separates from the glass, becomes black or flakes off and this ruins the rangefinder view by making it dim and unsharp. In many cases the mirror is so deteriorated it cannot produce a secondary image at all, rendering the rangefinder useless. Until very recently it has not been possible to restore the silver mirror but now a proprietary process has been developed that completely restores the silver mirror. Here's a picture of a recently re silvered fully reflecting mirror and its frame from a Contax Ia rangefinder:
This is a picture of the entire rangefinder assembly showing the pivot arm with its mirror, installed in the rangefinder:
This is a picture of the left side of the rangefinder showing the newly resilvered half reflection mirror. When you view through the rangefinder this is the mirror you are sighting through:
The mirrors in your Contax can be re silvered during a complete overhaul here. Please refer to the services page where you will find this service listed. This link leads to the Contax I services page: Contax I Services.
This is a picture of the back of the Contax Ia front plate showing the rangefinder installed:
The Contax IA:
In General the Contax IA is a shelf camera. Let me repeat this, the Contax IA is a shelf camera. There are some exceptions and you can find them if you are a very careful camera hunter. But in general, most have been badly abused by prior servicings to the point where they are so delicate it they have no more strength. If you buy one and want to use it very carefully for a single roll of film or two, and you treat the camera like its a 120 year old lady while you shoot that one or two rolls, the camera may live through it. But if you buy one of these with the expectation it's going to be a user just forget this idea. These cameras have generally been so mishandled and made fragile by bad maintenance it is impossible to restore them back to their original condition completely enough to make them tough and reliable enough for everyday use.
The Contax IA model was improved up to the IG with over 8 model changes in about as many years. Each and every one of these changes was identified to be necessary by serious user problems. The two killer user problems in the Contax IA are the lens mounting clip holding screw holes and the rewind knob shaft top. The clip screw holes strip and the metal is too thin to do anything with to repair the damage. The top of the rewind shaft is very fragile and even normal use with great care will ruin it. Both of these points on the camera are so fragile it is impossible to put into words. Zeiss also very craftily made it virtually impossible to repair these two items. If you use your Contax IA regularly, one or both of these points will quickly break and then that's all there is.
If you want a Contax I model to use buy only the last model the IG.
It's the only reliable and accurate Contax I model there is. And if you
can find one, get one with brass curtains. In my opinion every other
Contax I model is a shelf camera for collections only.
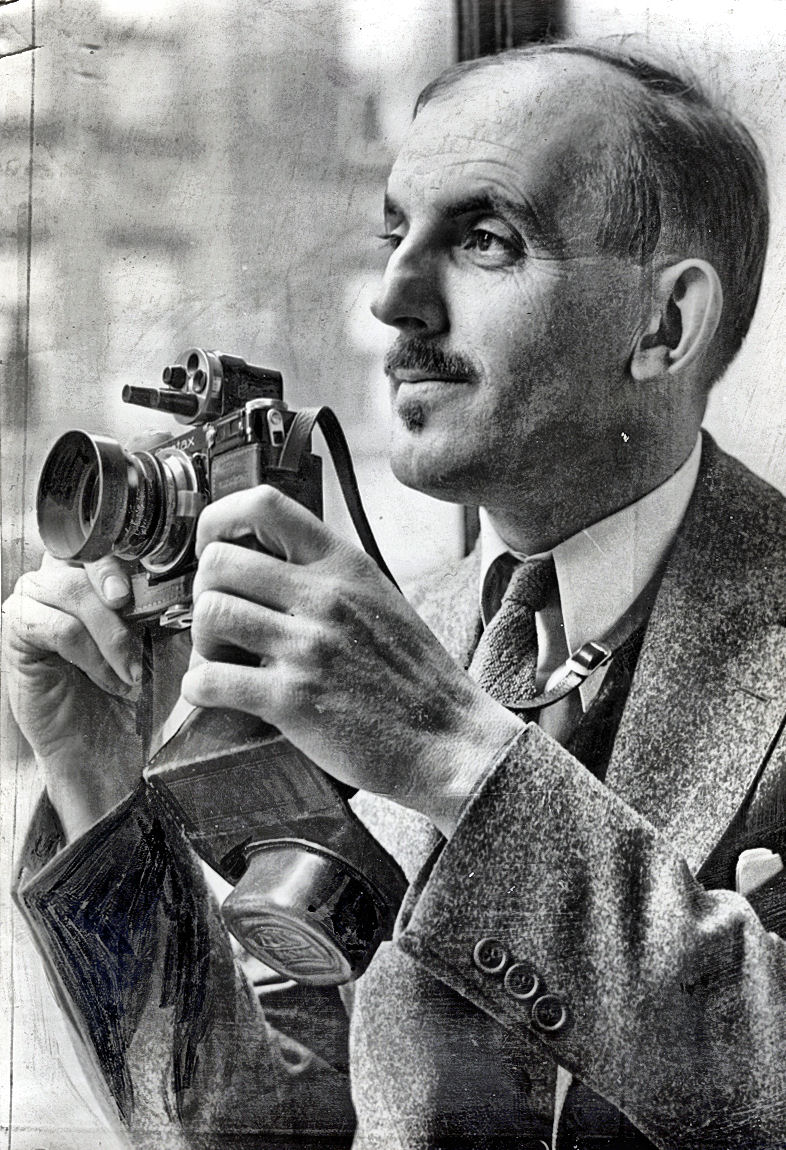
This is a picture of the great photographer Ansel Adams as a young man holidng his Contax 1. You'll notice he had great taste in lenses because mouted on it is the 4.25CM Biotar lens. It is a Contax I model Biotar and I've neve seen one of these.
What Condition is Your Camera in Now?
Since I first prepared this section of my web site I have had much more experience with the Contax I and can offer owners and prospective owners and collectors of this camera some of my observations from this experience.
I have come to the conclusion that when the Contax I was first marketed in 1933 it was a prototype design camera and it continued to be a prototype camera during its entire production run which continued from 1933 to sometime in the war years. Zeiss experts have noted that one of the main problems Zeiss had, as a company, was that it was too diffuse and supported too many camera lines and models. This is true with the Contax I. We know that in the seven to nine years in which it was manufactured the Contax I went through no less than seven major design changes resulting in todays' designation of Contax models Ia through Contax Ig. If there had been no need for major improvement in the design, there would have been no need to change the design. When the design of a camera is changed as rapidly, as often and as regularly as the Contax I design was changed this is indicative of important reliability issues that cannot be addressed any other way. I don't think all these design changes were announced by Zeiss. I have yet to see any advertising from the production period of this camera that indicates Zeiss ever announced the "new and improved" Contax I. What I am sure happened is that because Zeiss was very careful to keep the exterior of the camera relatively the same, the buying public never noticed the great majority of internal changes that happened during the production of this camera. It is only today that we are able to see this.
When a camera is disassembled/reassembled it undergoes wear. It is possible to wear a camera out simply by taking it apart and putting it back together too many times. The reason for this is that the constant removal, insertion and tightening of screws results in metal fatigue to the screw heads and the screw hole threads. Many of the Contax I's I see are at the verge of being too risky to be worked on because they are in this condition. They are in this condition because previous owners found the cameras to be unreliable due to its many design defects and kept returning it for repairs over and over again in repeated fruitless attempts to make the camera to be reliable or to correct uncorrectable design defects.
My overall conclusion is that the Contax I is, was and will always be a collectors camera and a user's nightmare. My advice is that if you haven't already bought one, and you intend to obtain one, spend your money on the very best looking one you can find. Be patient, be very patient, and go for exterior cosmetics. The simple fact is that if you buy a Contax I to use, it will disappoint you just as it disappointed previous owners. All Contax I's have reliability issues related to design defects that cannot be overcome by any kind of maintenance. If you want a Contax camera to use and you want a reliable picture taker strongly consider buying a Contax II, III, IIa or IIIa model. My opinion is that Zeiss should have discontinued the Contax I line with the introduction of the Contax II.
With the Contax I the condition that counts the most is the internal condition. There are no spare parts available for the Contax I. Each and every part in your camera is virtually irreplaceable. If your camera has not recently been completely disassembled, cleaned and lubricated it is very dirty with many parts grinding against each other dry. Old lubricants have deteriorated, become acid, and are corroding the fine finish of brass parts. There are particles of old film and metal meshing with the gears, and accelerating the wear. Think of what your car engine would be like today if it was 66 years old and you had driven it continuously since it was new, without adding any oil or having the original old oil changed. This is what the inside of your camera is like now. Here is an example picture. It shows the area underneath the that connects to the winding knob, and which drives the film advance mechanism. You can clearly see just how deeply worn the area beneath the gear is. This is a result of continued use with little or no maintenance. It is possible to restore your camera to like new condition so that you can use it regularly without fear of damaging it further. The way to do this is to have it rebuilt by me. The following series of pictures are of a Contax I during a complete overhaul. These are provided to help you understand just how precise and delicate the internal mechanisms of this very special camera are, and why regular maintenance is necessary to keep it operating.
Contax Shutter Accuracy Then:
The main fascination about the Contax 1 camera is the 1/1000 shutter speed. It is stunning to consider that this camera had such a high speed back when there were no films that could support it. The Contax 1 shutter is capable of such a speed, but only when it is in perfect condition. Unfortunately, even when it was being made back in 1936, it was not being manufactured in perfect condition. Now, some 66 years later, the shutter is in horrible condition.
The reason for this is that the Contax I camera is not maintenance friendly. It is perhaps the most maintenance unfriendly camera ever made. All of the parts interlock each other so that it is not possible to gain access to critical shutter components, such as the escapement platform, without complete camera disassembly. A large number of special tools are required to remove all of the special fasteners used in the camera. It is for these reasons that most, if not all, Contax 1's existing today have not been thoroughly serviced since the day they were made.
Contax Shutter Accuracy Today:
The Contax shutters we have today have traveled through at least 66 or more years of time. In this time all of the steel and brass shutter components have become oxidized and are covered by a very tenacious high-friction oxidation layer. In addition, the lubricants used in the shutter were both petroleum and marine animal based. In the past 66 or so years these lubricants have degraded and oxidized. The lubricants used in the rangefinder mechanism were petroleum based. Petroleum based lubricants have a unique property. Over time they spread to cover all accessible surfaces. Take a drop of oil, put it in the middle of a three foot square steel plate, put it in a safe place, come back in a year and that drop will have spread to form a thin film over the top, back and sides of the plate. Marine animal based lubricants dry up and harden. These are the natural processes that work to degrade a Contax shutter over the years. In addition, all the original petroleum based grease has completely disintegrated into sticky muck and oil. The muck makes controls difficult to operate, and the oil saturates into places where the mechanism should run dry.
The Contax shutter is a mystery to many people and is perplexing for one reason. This is the fact the shutter spring is wound to a higher tension for the low speeds than for the high speeds. There is a seeming contradiction in this. Normally the higher spring tension is for the higher speeds. This is the trick of the Contax shutter. The answer is simple. The higher speeds are entirely friction dependent. The low speeds are obtained by the use of two escarpments retarding the shutter movement by eating up the spring energy. Friction is good. The medium speeds use a single escapement. Friction is okay. The high speeds use no escapement, but rely upon variable shutter slit width, and the absence of friction. Accurate high shutter speeds cannot be obtained by adjustment of the initial shutter spring tension. Accurate high shutter speeds depend upon two things: 1) Accurate adjustment of the 1/1000 shutter slit width and 2) The elimination of friction in the shutter mechanism to the maximum extent possible. This is why people do not notice that a bound up shutter is actually bound up. However, when the high shutter speeds are selected, film will be grossly overexposed.
Taking The Shutter Apart:
The Contax I camera must be completely disassembled in order for the shutter to be completely serviced. The Contax I has many more parts than the later II and III models. These parts are all set into the camera body individually unlike the II and III models which are made of modular assemblies that can be removed separately. The best way to put it is that the Contax I is more like a Chinese Puzzle Box than anything else. Among cameras is is unique. The peculiar complexity of its construction makes it very hard and exacting work to disassemble the Contax shutter. In the later Contax II and III models, tolerances were adjusted by the use of many very thin washers. The Contax I contains very few washers to shim parts, the parts were made to great precision, are very delicate and must be handled with the greatest of care. Age and time have also caused parts to fuse, making it very difficult to separate them. Overall, the disassembly of the Contax I requires great skill, patience, and understanding.
Shutter Assembly:
The Contax I shutter has only one adjustment and this is the resting spring tension in the lower shutter curtain roller. When the shutter is assembled all of the gears must be carefully synchronized. If the assembly is as much as one tooth off in one direction, the shutter will jam when wound to the slowest speed. If it is just one tooth off in the other direction, the proper slit width for 1/1000 cannot be obtained. There are many other things to keep in mind while disassembling and reassembling the Contax shutter. The proper choice of lubricants is also essential. Some bearings require oil and others require grease. Some run dry. I use the most modern synthetic Swiss and French clock and watch lubricants in the Contax shutters I rebuild. These lubricants are more or less permanent. They do not degrade, harden or migrate.
Shutter Tapes:
The original shutter tapes were made to explicit design criteria for Zeiss. In some Contax 1 cameras these were made of cotton. These did not last, and so Zeiss changed to the use of silk tapes in the last Contax I cameras and in the Contax II and III line, Zeiss used silk. The tapes used during a modern rebuild are the silk tapes. They have a specific weave and dimensions. These are not available today. Substitute material is used by many people. Many people use nylon ribbon obtained from craft supply houses.
There are three problems with this tape. The size is usually incorrect, the material stretches under tension, and it is not durable. Only silk provides the required durability and resistance to stretching under tension. Only the required dimensions result in the proper friction when the tape slides through its slots in the upper shutter curtain. I use new silk shutter tapes made to the same specifications as the original. I am sorry to have to say I cannot sell any. The supply is sufficient only for my needs.
The following picture is of a special tool used to set the shutter tape length:

This fixture ensures that the shutter curtain edges will be absolutely parallel during exposure. It also demonstrates that to repair Contax cameras, one must be able to afford, or to make all of the special tools required to ensure the job is done right the first time. Tool design is a separate specialty and requires some time since none are available to copy.
Shutter Capping:
The term "capping" refers to the action of the shutter curtains when they mate and lock together at the end of the exposure. It is normal for a shutter to fail to cap very very occasionally; perhaps once in twenty or thirty rolls or so. I have heard of some cameras that have never had a capping failure. In any event, it is most important to never ever even think of taking your finger or a tool to adjust the shutter curtain edges to correct a perceived capping problem. In all cases such well intentioned attempts result in severe shutter damage. A shutter that has been so damaged may be made, after great effort, to cap; but it will never cap smoothly as it once did. Replacement shutter curtains are impossible to find for the Contax I cameras so they should be handled with the greatest of care and respect.
In the Contax Ia model there is no shutter curtain latching fingers to help the curtains stay together when the camera is wound. In later models there are two small spring steel fingers that help to hold the upper curtain lip inside the slot in the top of the lower curtain. Latching problems are more likely in the Ia model.
Shutter Cocking and Film Advance:
The winding knob also moves the film advance mechanism. The shutter mechanism located directly below the winding knob is extremely complicated. There is a shaft to which the knob is attached. This shaft actuates the film advance mechanism. There is a tapered steel pin attached to the underside of the winding knob. This pin mates with the shutter speed selector barrel. Rotation of this barrel cocks the shutter. Lifting up the winding knob allows the pin to fit into a series of slots in the top of the barrel. The slot selected controls the amount of rotation of the shutter mechanism and the spring tension. It is possible, with some effort, to shear off this tapered pin in an attempt to clear the shutter of a jam. Never ever force this knob. It is an expensive job to replace this pin. In addition, it is possible to completely ruin the shutter by warping of delicate components.
Clearing a Camera Jam:
Never ever force the winding knob. If the camera is jammed it must be opened to clear the jam. The camera cannot be un jammed by shaking or hitting it. The reasons why this is so are explained elsewhere in this document.
The Illustrated Camera:
I have put this page together to demonstrate the various steps in the complete shutter overhaul service of a Contax 1 rangefinder 35 mm camera. This is a work in progress and so as my overhaul of the current camera progresses I hope to add more pictures to fill out the entire story. The following pictures illustrate parts of the assembly process and pictures of critical cleaning and polishing steps. I am hopeful this first offering will help you understand the workings of this very unusual, complex and high precision mechanical marvel.
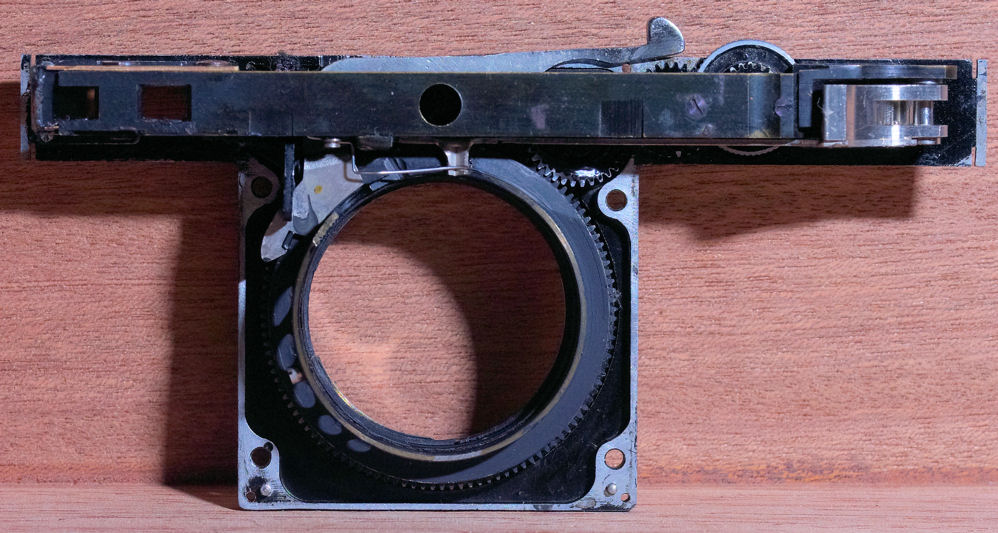
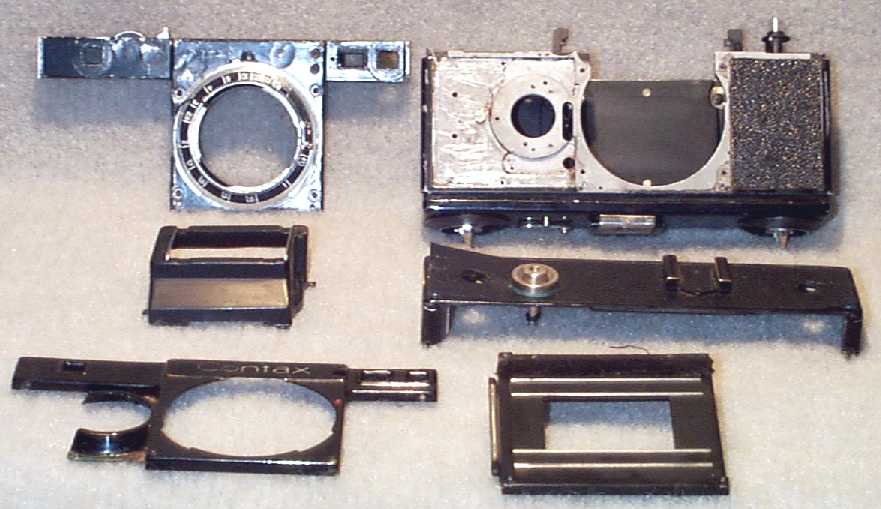
The first picture is of the camera when it has been disassembled into its major component parts. The items shown are the empty camera shell, rangefinder assembly, top plate, front plate and film plate.
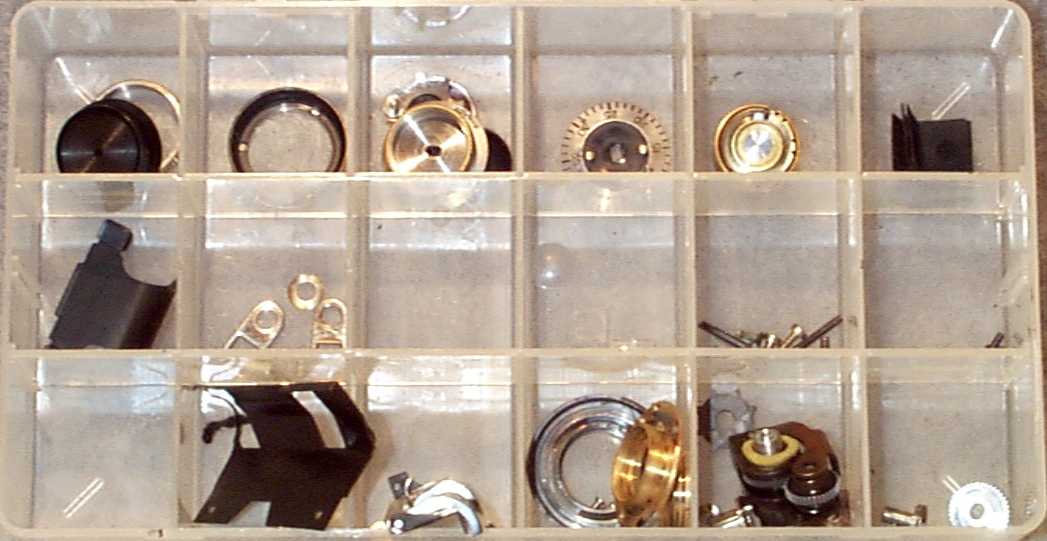
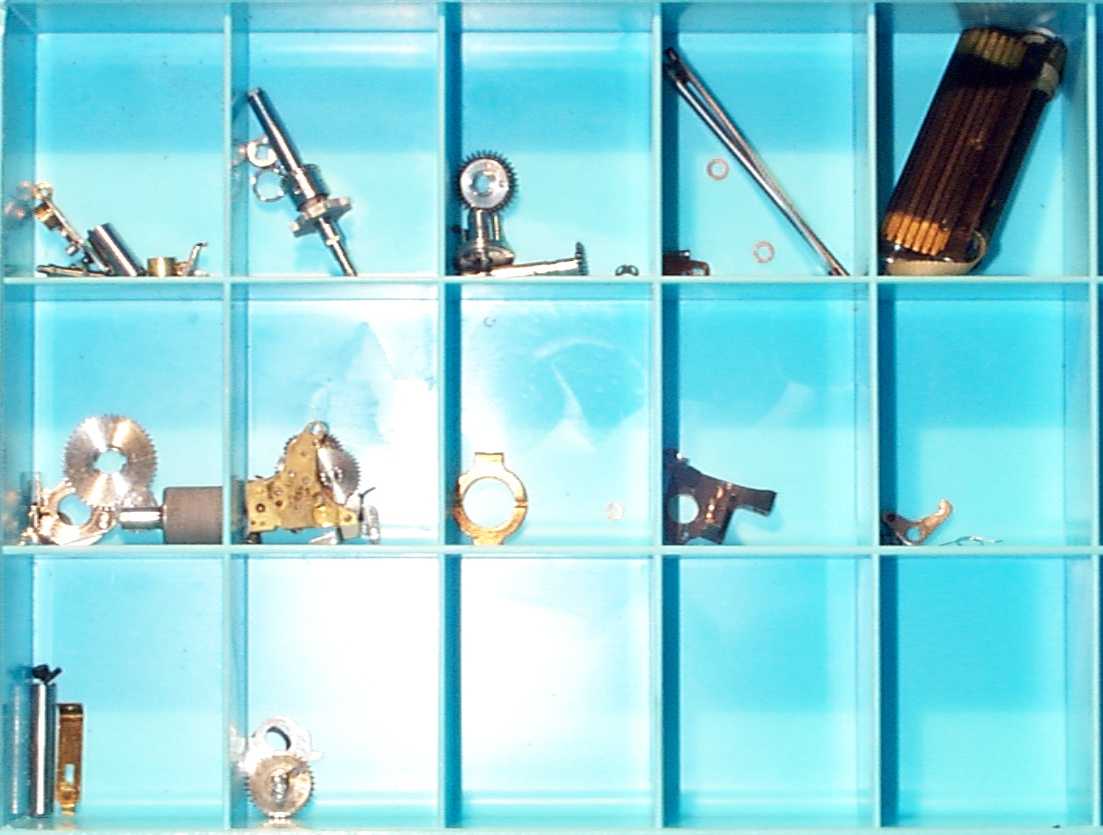
The next pictures are of all the tiny complicated internal parts, springs, screws and shutter curtains. They are all bright and shiny because they have been ultrasonically cleaned.
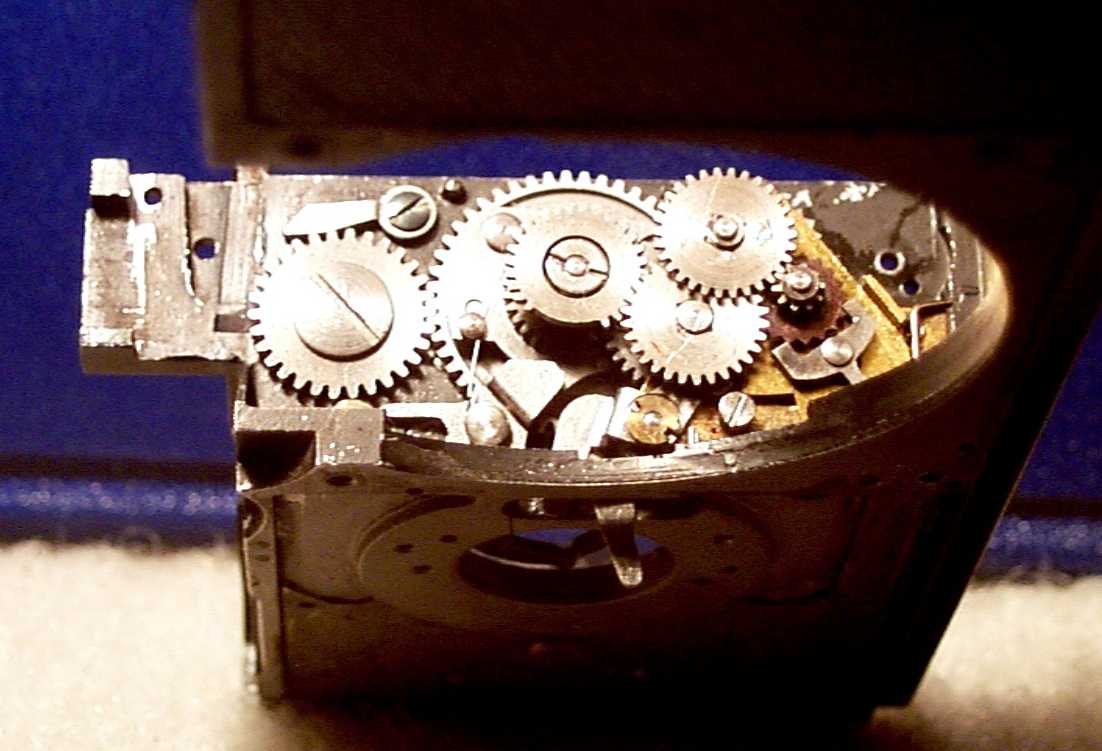
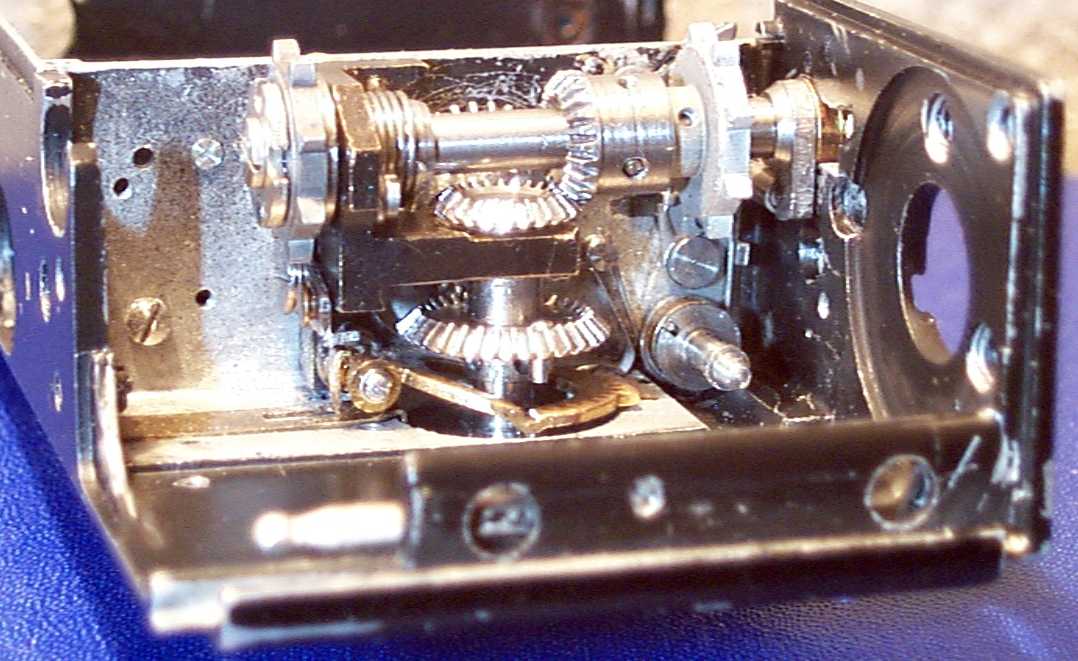
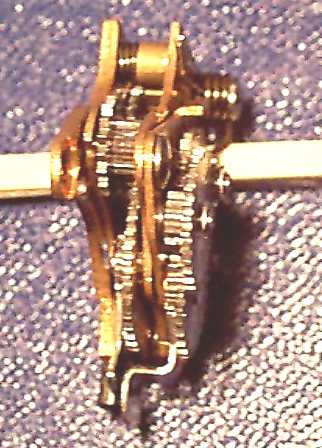
The next picture is of the shutter escapement and synchronizing mechanisms. Note how tightly packed the miniature parts are and how the main gear is synchronized through the camera wall. Complete camera disassembly is necessary to remove these components for cleaning and repair.
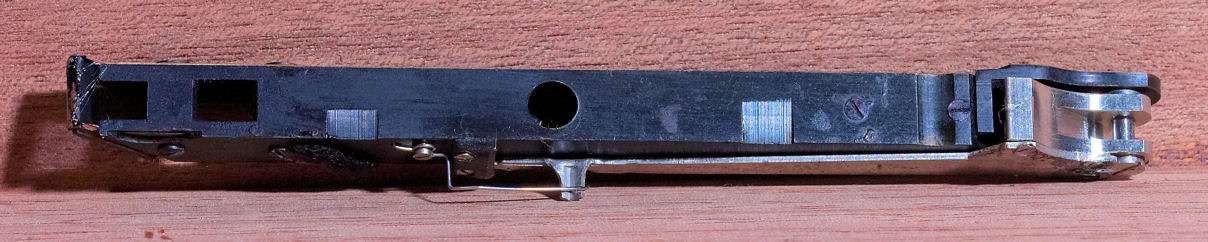
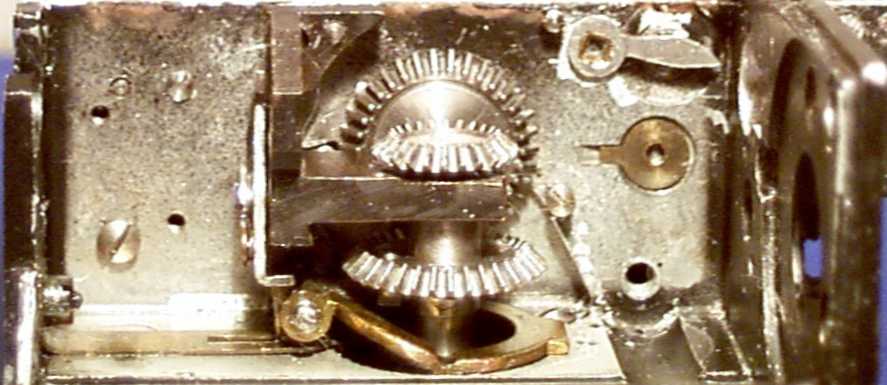
This picture is of the camera wall on the other side of the of the shutter escapement and synchronization assemblies. The shutter winding gear is flat against the wall, its mating gear is the lower of the two parallel gears, and the top of the two parallel gears mates to the film winding gear.
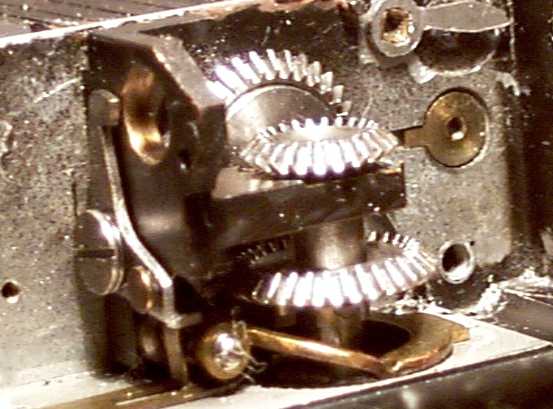
This next picture is of the same assembly, but from a different angle. It shows the brass frame for the gear works more clearly. Note the steel latch on the left side. It is one of two separate latches for the film advance mechanism. This latch is the one that ensures all picture frames will be the same size and be properly spaced. Please note carefully the little brass finger directly below the latch which is touching its foot. Note also that the empty hole to the right of the latch pawl holds the bearing for the film advance shaft. This shaft holds both film advance sprockets.
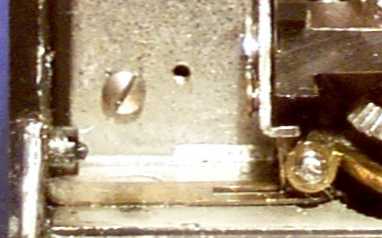
This picture is a close up picture of the bottom of the film advance latch shown in the picture above. This latch is not being held up by the round brass hinge on the steel shaft to the right, it is being held up by a thin finger of brass that has been die cut up out of the brass strip running along the bottom of the picture. Right now the latch is in the engaged position holding the film advance shaft from moving. When the film advance knob is turned, a cam on the bottom of it causes this finger to lift, releasing this latch, and allowing the film to be wound to the next exposure and the shutter to be cocked. You can see how very thin and fragile the little folded-up brass finger really is. This is a major design fault. If the camera is dropped or shaken hard enough, this finger will bend out from under the foot of the latch, the latch cannot be released, and the camera is permanently jammed. It is also possible for a number of lesser minor bumps and shocks to slightly bend this finger each time, so that finally, after a time, it has been bent enough, and the latch is engaged with the camera being jammed.
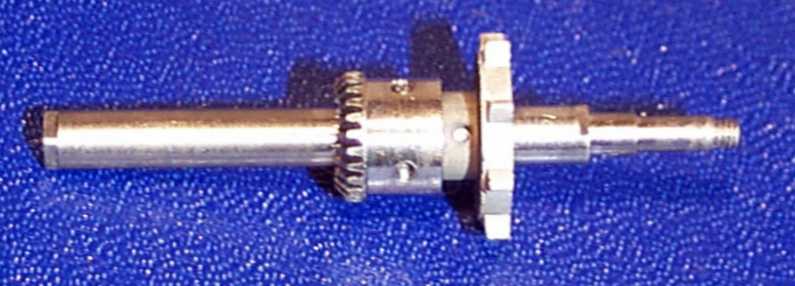
This is a picture of the film advance shaft. It is shown in the picture in the same orientation it would have if shown in one of the two pictures above. There are two empty threaded screw holes: one is located centerline on the aluminum film sprocket, and the other is below it and to the left. When the camera was originally manufactured, the gear and the film sprocket were held onto the shaft by the use of setscrews in these holes. Obviously, these failed if an attempt was made to solve a jam by turning the winding knob with the excessive force.
If the brass latch finger had been bent by a camera bump, and the left shaft latch is permanently engaged, excessive force applied to the film winding knob will cause the gear setscrew to fail, and the gear would just rotate on the shaft. Also, if the camera should be wound to the point where the film ends, the sprocket will be locked by the film being pulled taut in the cartridge. In this case, if excessive force is applied to the winding knob, the setscrew on the film sprocket will fail and the sprocket will be held stationary while the shaft rotates.
This picture shows another view of the same shaft that shows how Zeiss solved these problems: Directly below the empty screw hole at the top of the gear is the head of a tapered pin. This tapered pin passes through the gear, the sprocket, and the shaft, locking all three together. The second latch, which is located at the right of the shaft is robust enough to absorb the maximum excessive force that can be applied to the film winding knob. With this modification Zeiss insured that when the Contax I was jammed, it was jammed good and tight.
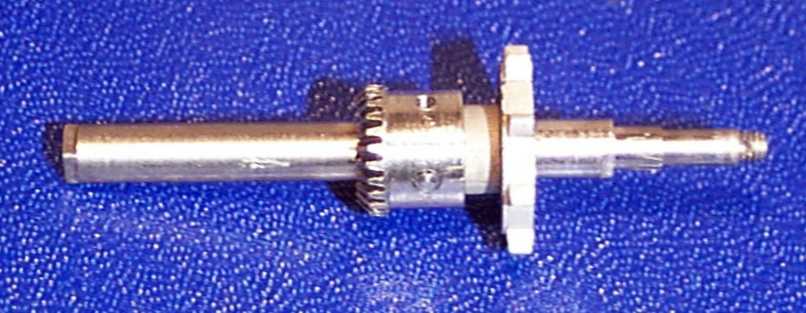
This picture shows the film advance shaft installed in the camera. You can plainly see the second latch on it at the far right.
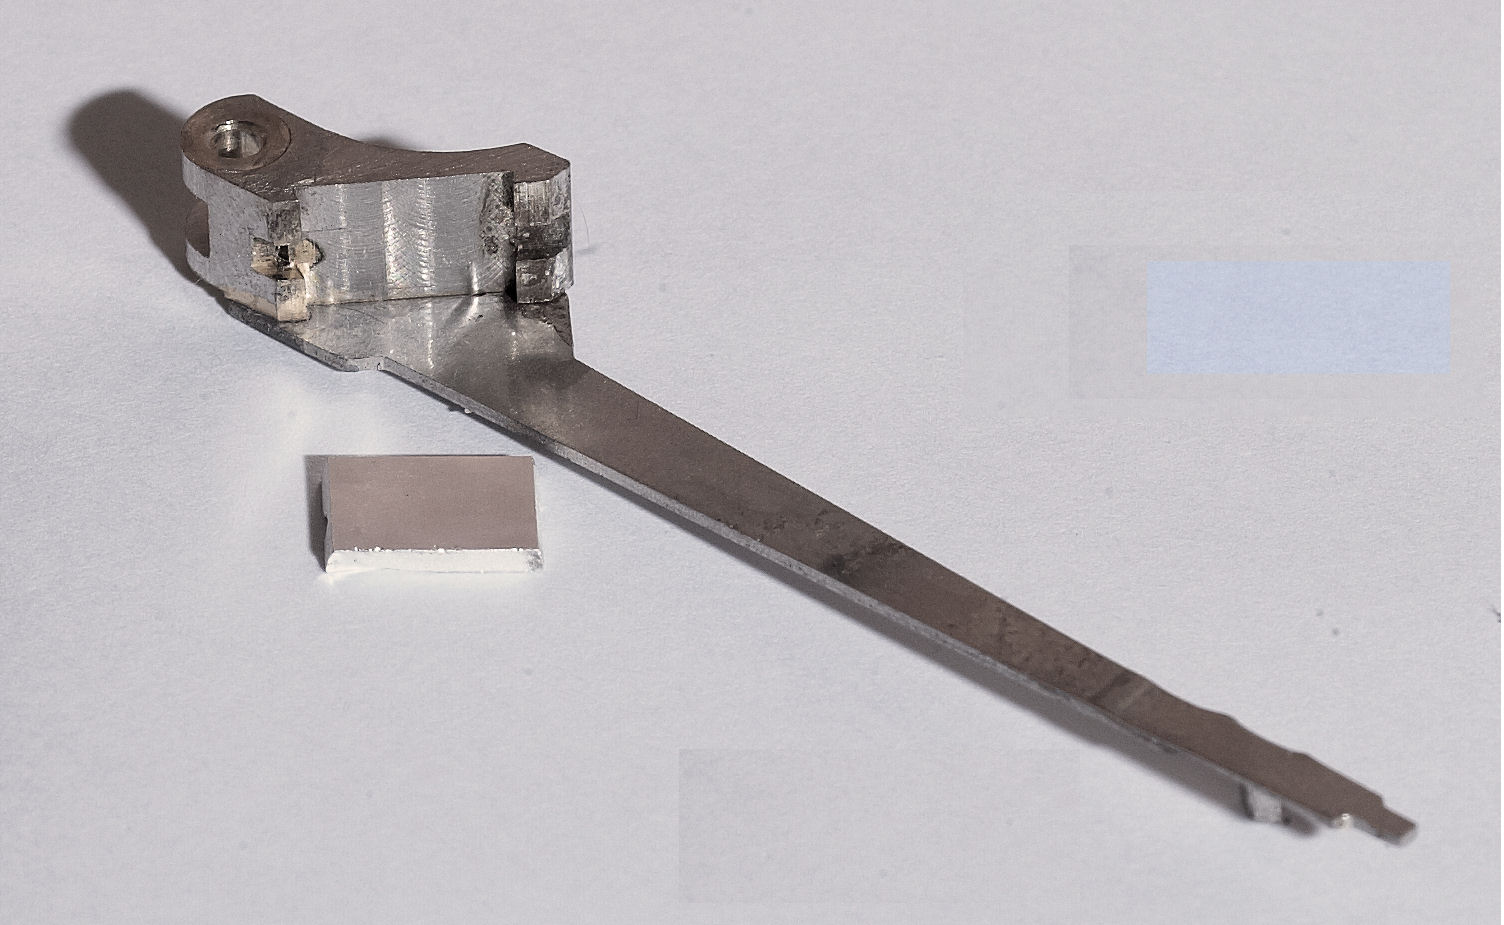
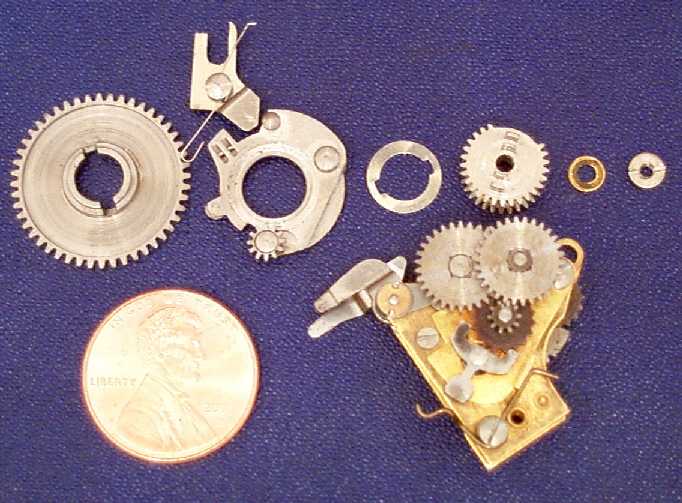
The following picture is of the shutter timing components. A penny is included for size comparison. This picture clearly illustrates the need for clean lubrication. These elements are as tiny as those in a fine watch. During an overhaul these components are ultrasonically cleaned to remove every trace of dirt and old lubricants. Then, each part is hand lubricated with the purest and finest French watch oil and Swiss watch greases.
The components are arranged in the relative positions they have when installed in the camera. The escapement assembly is on the picture bottom and right of the penny. This is the timing mechanism. It controls the rotation of the upper shutter curtain as it descends.
The next picture is a close up of the escapement mechanism. The little fingers at the upper left are the speed selectors. They rest in slots underneath the speed selector dial. Each slot has a different slope to its upper surface. When the shutter speed dial is rotated, the fingers are shifted differentially to manipulate the two escapements in this mechanism.

This picture is a sideway view of the escapement mechanism. You can see there are two escapements in it, one on top of the other. Each is mounted on a rotating platform and a change in the position of the setting finger will shift each escapement into or out of the shutter synchronization gearing as is necessary for the selected speed.
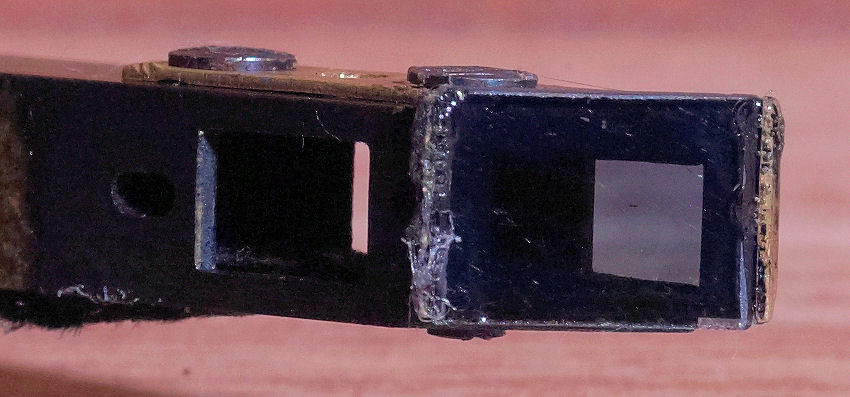
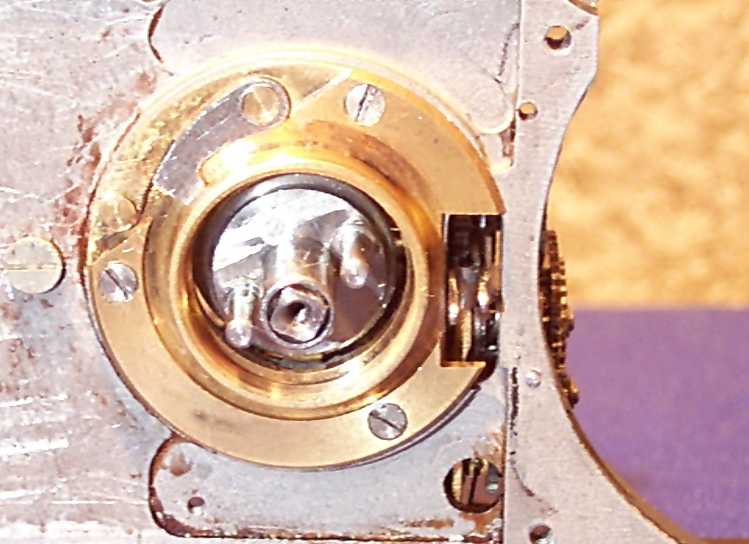
This picture shows the front of the camera. You can see the escapement speed selector fingers poking out of the slot on the right. The film advance shaft has the square end, and the shutter winding connection is the plate with two fingers that is inside the camera. The brass ring that is held onto the camera body with three screws is the holder for the speed selector knob. It has been restored to its original bright and shiny condition through the use of ultrasonic cleaning. Some parts require an hour or more of ultrasonic cleaning to remove the oxidation and scale caused by age and deteriorated lubricants.
This is a work in progress. Please keep coming back. Thank you.
