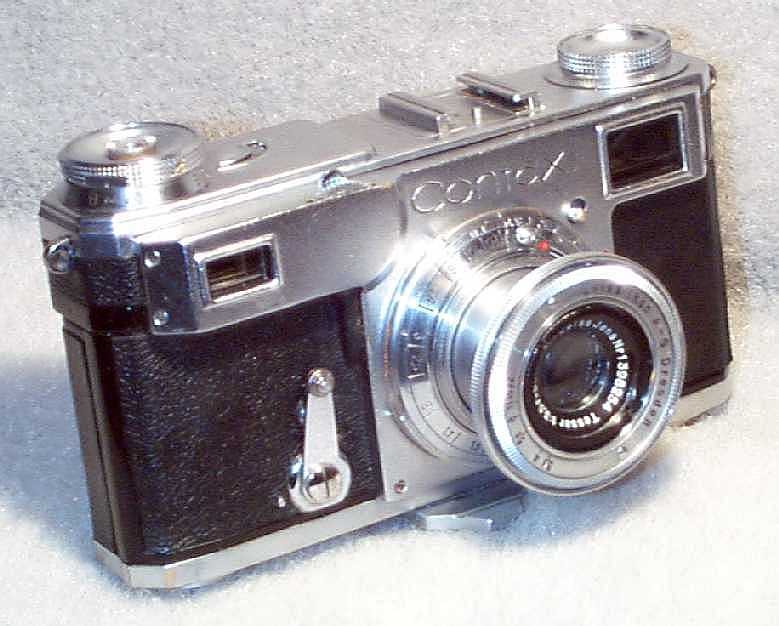
Zeiss Ikon Contax Camera Repair
A home for your Zeiss Ikon Contax, Contarex or Super Ikonta camera!
Sections
- The Do it Yourself Camera Overhaul
- Quirks of the Contax Shutter
- Flash Synchronization
- Contax Shutter Accuracy in A New Camera
- Contax Shutter Accuracy in a Camera Today
- Shutter Disassembly
- Shutter Assembly
- Shutter Tapes
- Shutter Capping
- Shutter Cocking and Film Advance
- Clearing a Shutter Jam
- Shutter Overhaul In Progress Pictures
- The Rangefinder
- Should the Speed setting be Changed Before or After the Camera is Cocked?
- Should the Camera be Stored with the Shutter Cocked or Released?
Overhauling A Contax II/III Shutter and Rangefinder
What condition is your Camera in Now?
External Condition:
 There is a very serious reason why we go the extra mile to thorougly
clean, sanitize and polish the exterior of every camera that comes here
for service. It is called basic sanitation. The exterior of
your newly purchased, but used for about 50 years, Contax is filthy dirty
beyond description. Bacteria, viruses, skin oil, just plain filth,
and who knows what else has been layered on it year after year. Look
at the milling of the speed control dial and you'll see a thick brown buildup.
This covers the entire camera. It's just a uniform coating and so
it's not as evident as it should be. My attitude is simply that it
would be the absolute height of carelessness verging on a crime, to allow
you to take such a thing, put it in your hands, and then raise it to your
face or to allow you to handle it and then go have a nice sandwich.
There is a very serious reason why we go the extra mile to thorougly
clean, sanitize and polish the exterior of every camera that comes here
for service. It is called basic sanitation. The exterior of
your newly purchased, but used for about 50 years, Contax is filthy dirty
beyond description. Bacteria, viruses, skin oil, just plain filth,
and who knows what else has been layered on it year after year. Look
at the milling of the speed control dial and you'll see a thick brown buildup.
This covers the entire camera. It's just a uniform coating and so
it's not as evident as it should be. My attitude is simply that it
would be the absolute height of carelessness verging on a crime, to allow
you to take such a thing, put it in your hands, and then raise it to your
face or to allow you to handle it and then go have a nice sandwich.
Every camera that comes here is cleaned thoroughly inside and out to ensure that it is as clean as it was when it was new. I can tell you that I wash my hands thoroughly before starting the assembly of a Camera out of freshly cleaned parts. This is why all the exterior parts are ultrasonically cleaned. It is why all the leather is carefully dry cleaned and given a fresh outer surface.
A dirty camera is just loaded with allergens. It is more than likely that many people have suffered needless allergy and asthma attacks from a dirty camera. This can't happen with a camera that's been overhauled here.
Your continued good health is part of the reason it takes longer here. We don't do anything that is not necessary but we do things which are not obvious. Your fingers can tell the difference. They know what's clean and what's not.
Internal Condition:
With the proliferation recently of truly criminal bad dealers who take kiev parts and Contax parts and put them together to make a beautiful Frankencontax that sells for about $600.00 but costs less than $100.00 to make there's no way to tell what the inside of camera with a Contax faceplate is from the outside. The only way to know for sure that the camera is a genuine Contax made of German parts is to partially disasemble it. If you have recently purchased a Contax II or III and want to know what you got you can send it here for a quick and cheap written evaluation. Just use this link to access the Contax camera service and prices page and you'll find it listed there.
Do it Yourself Camera Overhaul
I think that anyone who has a reasonable amount of mechanical experience is capable of taking the camera apart and cleaning the optical elements of the range finder and the lens mount helical threads so that the range finder and viewfinder is clear and the action is loose. The shutter is another matter. It is too complex, has too many fragile parts and requires too many special tools and watchmaking skills for most people to undertake its disassembly.
This truth goes unexpressed, and is bypassed, in the web sites that promote home-brew overhauls and in the book "Contax Repair" that is published in England and sold regularly on Ebay. These authorities make the case that all that is necessary to restore a pre-war Contax shutter to proper operation is to clean it with lighter fluid or other solvent and then to apply light machine oil to the works. This advice is bad. No matter how well solvent is applied from the outside of the shutter works, it will not penetrate and remove the old hardened grease from the bearing journals. And no matter how good the oil is that is applied, it will not be held by old metal with a film of corrosion on it. These are fundamental truths of machines that experts in the field learned more than three hundred years ago. This is why watches are taken apart to clean them.
Grease is made of two components, a soap and oil mixed together. Bathroom soap is acid fat that is neutralized with sodium metal. The soap used in lubricating grease is made with a metal other than sodium such as lead or lithium or other metal. When grease gets old the oil and the base soap separate from each other. The oil migrates outward and the soap stays where it was originally applied and becomes hard and sticky. It will not mix with oil applied from the outside some twenty or so years later.
Oil has a natural tendency to spread. The oil that disassociates from the old grease in a Contax shutter tends to spread out over all of the inner and external surfaces of the camera. This is why many old Contax cameras look so nice. They are covered with a layer of oxidized oil. This property of oil to spread in this way has been known from the time watches were first made. Early watches were highly unreliable due to the crudity of the oil that was available to lubricate them. Improvements in matchmaking were allowed by improvements in lubricating oil. Today there are available a large number of extremely fine oils for use in small bearings that have a natural reluctance to spread providing the metal to which they are applied is extremely clean. It has only been since the advent of the invention of the ultrasonic cleaner that it has become possible to clean old metal so that new modern oil will adhere to it.
It is not possible to apply oil to the exterior of the works of an old Contax shutter and have that oil do anything other than get away from it. The oil will not penetrate to the bearings. And the problem is that the better the oil, the more rapidly it will migrate from dirty metal.
What actually happens in a Contax shutter if the various instructions I have discussed are followed is that the shutter is forced to operate by hand until the old soap deposits in the bearings become polished. Shutters so treated may appear to function well for a short while, but they will always have capping problems. Capping problems are caused by excess internal friction in the shutter mechanism associated with the operation upper shutter curtain (most of the shutter mechanism). Many people doing a do it yourself overhaul will tend to increase the shutter spring tension in an attempt to overcome the internal friction so that the shutter curtains will latch together. The problem with this approach is that one turn too many (about nine turns) on the adjustment screw will destroy the spring that pulls down the lower shutter curtain. Once this spring is destroyed a new shutter curtain is required because there is no way to replace the center spring on the shutter shaft. It is possible for a shutter with a wrecked center spring to appear to operate well at slow speeds. But a shutter with a damaged center spring will shade at higher speeds because the lower curtain will not be pullled down fast enough to avoid prematurely meeting the upper curtain on its way down.
About one out of every three Contax II/III bodies I buy on Ebay has a ruined center shutter spring. If you have a Contax II or III with a shutter that shades at higher speeds, it can be repaired. Write to me.
If you have done an overhaul, your shutter curtains are not capping properly, and you have reached eight turns on the spring adjustment shaft (count very carefully as you turn the screwdriver). It's time to stop and have the job done properly.
My advice to anyone thinking of buying a Contax Camera from someone else is to simply ask if the camera comes with a one year guarantee. If it does not, consider that mine come with a one year guarantee. I stand behind my work unconditionally.
Quirks of the Contax Shutter:
The Contax shutter has some quirks to it. The shutter design is very early. There are two main problems that will vary from shutter to shutter causing it to be different. The first is the bottom stop of the lower shutter curtain. There are two parts to the bottom stop. One is the shutter frame casting and the other is a "wing" on the right and left sides of the shutter curtain that hit the bottom stop on the frame when the shutter travel is complete. Each design has its problems. Some designs have bigger wings that can hang up on shutter components while the shutter curtain is descending when the camera is held at an angle. Others have different shaped parts on the shutter frame that can become loose and have wings that are too small making the shutter curtain liable to go too far and make it difficult for the shutter curtain to latch and cap with the upper shutter curtain. Zeiss just kept experimenting and never got it exactly right. I have found five different designs of bottom stops, and there are probably more out there yet undiscovered.
Another problem with the Contax shutter comes from the multiple slat design of its shutter curtain. The slats are kept in place by thin strips of leather that are held in place on the right and left side of each curtain by the use of thin folded brass tabs on each slat. As the shutter ages, the leather becomes brittle and breaks. This makes the slats able to move out of position (right or left) making the curtains liable to get caught on parts of the shutter when the curtain descends. This makes the shutter liable to hang up if the camera is held out of the normal vertical position. It isn't possible to see an out of position slat since the ends are hidden under the camera back cover. Even if the leather strips are replaced, there is still a side flex to the shutter curtains. There is also a part size variation in the shutter frame. If your camera has a shutter frame that is a little bit too small and a curtain with good leathers but it is a little bit to flexible, you can have shutter hang-up if you hold the camera in an odd position.
The point is that the Contax shutter is an antique design. It is a very early design and Zeiss kept working with it continuously until it was finally perfected in the Contax IIa/IIIa camera. It only took about 60 years to get it right and so you should not expect perfection from a 1932 design Contax II or III shutter. It wasn't perfect then, and it isn't perfect now.
Part of the fun of using an antique camera is living with the same things people lived with when the camera was new. The main good thing about the Contax is that it takes pictures that equal those that come from the best of today's cameras. It is those marvelous Zeiss lenses with their Contax mounts that make the Contax bodies with their shutters with "personality" necessary.
Flash Synchronization:
Zeiss didn't get around to installing flash syncrhonization in the Contax cameras until after 1950. All previous models didn't have any integral mechanism of flash synchronization. Many people have made an effort to modify the Contax II or III to install flash synchronization in the camera body. Every such example I have seen is a failure and relies upon the same scheme. A brass or copper electrical contact is installed inside the shutter compartment so that the brass side wing of the bottom stop of the lower shutter curtain makes an electrical contact when the lower shutter curtain hits the bottom stop.
There are five main problems with this scheme. The first problem is the materials the installed contact is made of. Only a special alloy of copper has the required strength, toughness, spring and electrical conductivity required so that it will stand up to the beating it will be given by the lower shutter curtain bottom stop. This alloy is beryllium copper. It is relatively unavailable, expensive and is sold only in large quantities, so no one ever used it. It is also extremely toxic, and even a single exposure to the dust generated by the filing, drilling or sanding of it can cause a fatal lung disease. So even if you can get some of it, don't do it. Every example of a flash synchronization contact put into a Contax II or III camera that I have seen was made of normal copper or brass. In all such cases the scheme failed because the contact was quickly hammered out of shape.
The second problem is that the electrical contact is interrupted by the migration of oil from the shutter. As is disccussed elsewhere, the old grease in an old Contax shutter sheds its oil. This oil migrates out of the shutter and covers all parts of the camera, including the installed flash synchronization contacts. The oil covers the contact and insulates it electrically.
The third problem is also electrical. Even if the flash contact in the shutter makes good electrical contact the electrical path from the contact to the flash synchronization socket is through the entire camera body. This introduces a high degree of electrical resistance to the circuit. This high resistance can cause a flash not to work even if there is a good electrical connection between the installed brass or copper contact and the shutter bottom stop tab.
The fourth problem is that the scheme involves the drilling of holes in the camera and otherwise defacing it and destroying its value. I recently removed a flash synchronization circuit from a very rare post-war Zeiss Jena made Contax II. This body would be worth in excess of $1,000.00 if only it had been left in original condition. Now, even though the holes have been filled and everything else has been restored it is worth only about $125.00.
The fifth problem is craftsmanship. Every example I have seen of an installed flash synchronization system has used glue and electrical tape instead of expertly made electrical components made of metal and plastic. Glue and electrical tape fail from exposure to the oil shed from the old grease in the shutter or from oil applied directly. The glue softens and looses its strength and the tape adhesive softens and loosens. It's just a real mess. Once the glue loosens and the tape releases the electrical contact moves out of position and the scheme fails.
My simple advice to anyone contemplating the work of installing a home made flash synchronization system in a Contax II or III is to not do it. Chances are it won't work, and even if it does initially, it won't work for long. If you want a Contax with flash synchronization buy a Contax IIa or a IIIa camera. Even though these bodies are more expensive than a Contax II or III, purchasing a IIa or a IIIa is less expensive than removing all of the value from a II or a III.
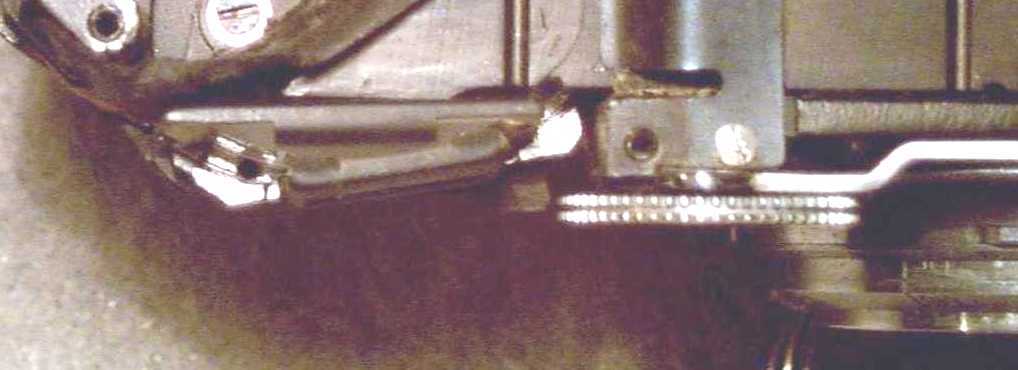
The following two pictures show the results and repair of a very bad flash synchronization. The first picture is of the lower shutter curtain upper lip. It has two prongs pointing downward that meet the bottom of the camera when the shutter is operated. These prongs set the bottom alignment of the lower curtain and if they are not just right the shutter will not properly cap and latch and it will be cocked. In the first picture you can see how the left side prong has been completely removed to allow the installation of an electrical contact. The contact interfered with shutter operation and has been removed. The silver color is the residue solder.

The second picture is of the same curtain lip after a piece of brass has been welded into place and filed into shape:

This is a difficult repair. With this camera the shutter was a unique post war German Jena made shutter and so there were no repair parts or substitute shutters available. In most cases a shutter with flash synch. installed has to be replaced. In most cases the repair is expensive and it's always better to buy a body without flash synch. installed to begin with.
Contax Shutter Accuracy Then:
The main fascination about the pre-war Contax camera is the 1/1250 shutter speed. It is stunning to consider that this camera had such a high speed back when there were no films that could support it. The Contax shutter is capable of such a speed, but only when it is in perfect condition. Unfortunately, even when it was being made back in 1936, it was not being manufactured in perfect condition. My hypothesis for this is simple. In 1936 Germany was rearming. Industrial diamonds cost gold. All industrial diamonds were reserved for war production. Polishing all of the many shafts, gears, sliding surfaces, and bearings to the precision required for the shutter to realize its full potential requires one micron dimond lapping compound. In addition, such polishing takes about eight hours per shutter. Had the shutters been given this treatment, the price of the camera would have been even higher, and it was plenty high in depression time 1936.
Contax Shutter Accuracy Today:
The Contax shutters we have today have traveled through at least 50 years of time. In this time all of the steel and brass shutter components have become oxidized and are covered by a very tenacious high-friction oxidation layer. In addition, the lubricants used in the shutter were both petroleum and marine animal based. In the past 50 or so years these lubricants have degraded and oxidized. The lubricants used in the rangefinder mechanism were petroleum based. Petroleum based lubricants have a unique property. Over time they spread to cover all accessible surfaces. Take a drop of oil, put it in the middle of a three foot square steel plate, put it in a safe place, come back in a year and that drop will have spread to form a thin film over the top, back and sides of the plate. Marine animal based lubricants dry up and harden. These are the natural processes that work to degrade a Contax shutter over the years. There are more causes.
Most Contax shutters in the working cameras were serviced. This means, for the most part, repair persons attempted to loosen them up by saturating them with oil. This is the method recommended by the currently published book on the Contax cameras. The problem with this method is that it is completely ineffective. There is a simple reason for this.
The center of the Contax shutter is the main synchronization gear. Through the center of this gear shaft is another shaft: the medium speed escapement shaft. The main gear shaft rides in a large copper bearing that was originally lubricated with marine animal based grease. The escapement shaft was lubricated with marine animal based oil. Over time the grease has hardened. When the oil soak method is used, what actually happens is the main gear is forced to move by hand pressure. The application of oil and movement acutally polishes the hardened grease and so movement under spring pressure is obtained, but the friction in this bearing is substantial. In addition, the oxidation layer on the medium speed escapement shaft means the medium speed escapement will cut in late in the shutter movement once released. Most people think the shutter is operating normally when in this condition for a good reason.
The Contax shutter is a mystery to many people and is perplexing for one reason. This is the fact the shutter spring is wound to a higher tension for the low speeds than for the high speeds. There is a seeming contradiction in this. Normally the higher spring tension is for the higher speeds. This is the trick of the Contax shutter. The answer is simple. The higher speeds are entirely friction dependent. The low speeds are obtained by the use of two escapments retarding the shutter movement by eating up the spring energy. Friction is good. The mediuim speeds use a single escapement. Friction is okay. The high speeds use no escapement, but rely upon variable shuter slit width, and the absence of friction. Accurate high shutter speeds cannot be obtained by adjustment of the intial shutter spring tension. Accurate high shutter speeds depend upon two things: 1) Accurate adjustment of the 1/1250 shutter slit width and 2) The elminiation of friction in the shutter mechanism to the maximum extent possible. This is why people do not notice that a bound up shutter is actually bound up. However, when the high shutter speeds are selected, film will be grossly overexposed.
Taking The Shutter Apart:
The shutter must be completely disassembled to get the main synchronization gear out so its bearing may be properly cleaned and polished. It is very hard and exacting work to disassemble the Contax shutter. Tollerances were adjusted by the use of many very thin washers. These become glued together with hardened lubricant. They will separate in the ultrasonic cleaner and so they must be labeled and held together with wire loops to ensure that when they separate in the cleaning bath the do not go all over the place.
Shutter Assembly:
The Contax shutter has only one adjustment and this is the resting spring tension in the lower shutter curtain roller. When the shutter is assembled all of the gears must be carefully synchronized. If the assembly is as much as one tooth off in one direction, the shutter will jam when wound to the B position. If one tooth off in the other direction, the proper slit width for 1/1250 cannot be obtained. There are many other things to keep in mind while disassembling and reassembling the Contax shutter. The proper choice of lubricants is also essential. Some bearings require oil and others require grease. Some run dry. I use the most modern synthetic Swiss and French clock and watch lubricants in the Contax shutters I rebuild. These lubricants are more or less permanent. They do not degrade, harden or migrate.
Shutter Tapes:
The original shutter tapes were made to explicit design criteria for Zeiss. They were made of silk and have a specific weave and dimensions. These are not available today. Substitute material must be used. Many people use nylon ribbon obtained from craft supply houses. There are three problems with this tape. The size is usually incorrect, the material stretches under tension, and it is not durable. Only silk provides the required durability and resistance to stretching under tension. Only the required dimensions result in the proper friction when the tape slides through its slots in the upper shutter curtain. I use new Japanese silk shutter tapes made to the same specifications as the original. I am sorry to have to say I cannot sell any. The supply is sufficient only for my needs.
Shutter Capping:
The term "capping" refers to the action of the shutter curtains when they mate and lock together at the end of the exposure. There is a flat spring with catches on either end that is at the bottom end of the top shutter curtain. You can see the two screws that hold it on while the shutter is being cocked. The two catches latch into slots on the top of the lower shutter curtain. Both the ends of the spring and the slots are at the outside edges of the shutter curtains and are covered by the camera back so they are not normally visible.
The capping mechanism is extremely delicate and it relies upon the most precise of alignments. It is normal for a shutter to fail to cap very very occasionally; perhaps once in twenty or thirty rolls or so. I have heard of some cameras that have never had a capping failure. In any event, it is most important to never ever even think of taking your finger or a tool to adjust the shutter curtain edges to correct a perceived capping problem. In all cases such well intentioned attempts result in severe shutter damage. A shutter that has been so damaged may be made, after great effort, to cap; but it will never cap smoothly as it once did. Replacement shutter curtains are hard to find and are very expensive.
If the curtains in your shutter are failing to cap regularly this is a sign the friction in the shutter is too great and it is time for a complete overhaul. The main problem in a shutter causing capping failure is excess friction in the mechanism that drives the upper shutter curtain. It is not possible to correct a capping problem from outside the camera or by hitting or shaking it.
If your camera's curtains are failing to cap write to me.
Shutter Cocking and Film Advance:
The winding knob also moves the film advance mechanism. The shutter mechanism located directly below the winding knob is extremely complicated. There is a shaft to which the knob is attached. This shaft acutates the film advance mechanism. There is a tapered steel pin attached to the underside of the winding knob. This pin mates with the shutter speed selector barrel. Rotation of this barrel cocks the shutter. Lifting up the winding knob allows the pin to fit into a series of slots in the top of the barrel. The slot selected controls the amount of rotation of the shutter mechanism and the spring tension. It is possible, with some effort, to shear off this tapered pin in an attempt to clear the shutter of a jam. Never ever force this knob. It is an expensive job to replace this pin. In addition, it is possible to completely ruin the shutter by warpage of delicate components.
Clearing a Camera Jam:
To clear a shutter jam the first thing to do is to find out if the problem is film or shutter related. This is simply accomplished. Pushing down and rotating the shutter release button so that the red dots are opposed disengages the shutter cocking from the film advance. Here are the steps to follow to diagnose and clear a jammed camera:
- Push down firmly on the shutter release button, allow it to rise, and then attempt to rotate the winding knob. If it rotates, the jam is cleared. If it does not go to step 2.
- Push down firmly on the shutter release button and rotate it so that the red dots on the releasebutton and the winding knob bezel next to the button are opposed. Then, attempt to turn thewinding knob. If it rotates the camera has a shutter problem that cannot be diagnosed or corrected without camera disassembly. Send it to me by insured delivery. If the winding knob does not rotate, the problem is with the film advance, proceed to the next step.
- Push down on the film rewind release button on the camera bottom. Hold it down and attempt to rotate the wind knob. If it rotates the problem is a film jam. Rewind the film and open the camera back. It is possible the film counter dial was inadverntently rotated backward by contact with clothing. In such a case the film can be expended without it being noticed. When the limit of the film strip is reached, its attachment to the film cartridge spool will restrain movement of the winding mechanism. Rewind the film and then reset the shutter release so that the red dots are next to each other and test the camera. It should function normally. If it does not there is a film advance mechanism problem that requires camera disassembly for diagnosis and correction. Send the camera to me by insured delivery.
The Illustrated Shutter:
I have put this page together to demonstrate the various steps in the complete shutter overhaul serivce of a pre-war Contax rangefinder 35 mm camera. This is a work in progress and so as my overhaul of the current camera progresses I hope to add more pictures to fill out the entire story. Right now, the shutter has been removed from the camera and has been disassembled, the parts cleaned and polished, and it has been assembled to the point of installation of the shutter blinds. The following pictures illustrate parts of the assembly process and pictures of critical cleaning and polishing steps. I am hopeful this first offering will help you understand the workings of this very unusual, complex and high precision mechanical marvel.
The first picture is of the camera when it has been disassembled into its major component parts. The camera is a III. The meter has been removed and the shutter curtain has been removed from the shutter.

The next picture is after the shutter has been disassembled into its major and minor parts. The only thing left to disassemble is the low speed escapement. An escapement is an assembly of gears having the purpose of using energy to slow down the mechanism. The Contax shutter has two escapements. Notice also the shutter blind reel. It contains three independent springs. The Contax shutter contains many precision parts which must be assembled in sequence using the many provided spacing washers. These parts appear discolored and dull because they are fresh out of the shutter and have not yet been ultrasonically cleaned and polished.

The next picture is of the shutter frame in detail. The large brass annulus is the journal for the mail gear. This bearing is the one in the shutter which is most impacted by the age hardening of the old lubricant. When most people try to fix an old shutter they put lots of oil here. It merely lubricates the plating of old lubricant and does not allow the shaft to turn freely. This severely impacts the ability of the shutter to perform at the high shutter speeds. The brightness of the metal shows this frame has been ultrasonically cleaned. The next job is to micro polish the main gear journal.

The next picture is a high magnification close-up of the main gear journal after it has been micro polished. I am showing it because only the main gear journal is large enough to allow the polish to be shown photographically. To polish the shutter components I use six micron and one micron diamond lapping compounds. The components in the shutter cocking/release mechanism are polished to a high finish because the high shutter speeds depend upon the minimization of friction in the shutter.

The next picture is of the medium speed escapement component parts. These parts were not shown in the first picture of shutter parts. There are two escapements in the Contax shutter. The low and medium speed escapements are both used at the low speeds of B, 1/2, 1/5, 1/25 and 1/50. For the medium speeds, only the medium speed escapement is cut in. It functions for the speeds of 1/125 and 1/250. There is no escapement cut in for the speeds 1/500 and 1/1250. These highest speeds rely entirely on a change in the shutter curtain edge spacing and raw unchanged spring power.

The two escapements fit on top of each other through the three holes to the right of the main gear journal. All of the gear journals, shafts and mounting edges are micro polished in this assembly. This polishing does not affect the high speeds. It has two beneficial effects. Firstly, it makes the shutter speeds at low and medium speeds far more repeatable. Most normal dirty Contax shutters will vary widely within the same speed from exposure to exposure. For example: 1/5 second will vary within the range of 1/2 to 1/10 second. Only one out of every eight to ten exposures will actually be at 1/5 second. A shutter with micro polished escapements will have the same speed uniformly from exposure to exposure and 1/5 second will be very very very close to an actual 1/5 second. Secondly, it reduces the shutter tension necessary to obtain an accurate 1/2 second shutter speed. This extends the life of the shutter tapes.
The next picture is of the medium speed escapement installed on the shutter frame. It is held in place with a star gear on the left. This star gear is pinned to its shaft. Removal of this pin is one of the very critical high risk operations necessary to completely disassemble the shutter. The pin used is a very small taper pin. Because it is a taper pin it fits into its shaft very tightly.

The next picture shows the main gear with the medium speed escapement arm. This arm is spring loaded and connects the medium speed escapement to the main gear. The shaft for this arm passes through the center of the main gear shaft. The hardening of old lubricant on this shaft adds useless friction to the shutter assembly and impacts the high speeds. Notice the two gear shafts on the low speed escapement arm are friction fit into the arm. This makes it impossible to remove the shafts and gears for polishing. To polish these, a slurry of diamond compound and oil is used to lubricate the gears and they are then manually rotated for some time to polish the shafts and gear journals to each other. This slurry is then removed by prolonged ultrasonic cleaning. The medium speed escapement swings around its main shaft and so a spring loaded gear assembly is needed to connect it to the main gear.

The next picture shows the other side of the same side of the shutter frame.

In this picture, on the right, you can see the cam which is rotated by the main gear. To the left top is the low speed escapement. On the extreme left is the medium speed escapement selector arm. It goes under the works and emerges as the triangular shaped contact resting on the top of the cam. Notice the other contact at the left of the cam. Shutter speeds are controlled by the rotation of the main gear cam acting on these contact points to cut in or cut out the appropriate escapements for each speed. This explains why the Contax shutter is so different and the low speeds result from the higher shutter tension. It is only when the cam is rotated the maximum extent that both escapements are cut in. Hence, when the shutter is cocked to the least tension the high speeds are selected. This means the high shutter speeds are totally dependent on two main factors. The first is the intrinsic friction in the shutter mechanism and the second is the width of the shutter curtain spacing when the shutter is cocked at 1/500 or 1/1250. This is why micro polishing is absolutely necessary. While not shown in the picture, the way both escapements are cut out is by a cut out portion of the gearing on the main gear. About 2/3 of the gearing height is cut away. This leaves enough gear teeth to rotate the shutter curtain for cocking and release, but not enough to engage with the gearing to the escapements.
The next picture is of the top of the film advance/shutter cocking/speed selector part of the shutter frame. This is a very complex mechanism and its problems and faults are responsible for many of the frustrating problems associated with operation of the old Contax rangefinder cameras. The main frustration source is derived from the arm at the top. When the shutter release is pushed, this arm is pushed from the left (see the slot on the extreme left, an arm from the shutter pushes here). The arm then slips out of a groove into which it fits on the right. Notice the fact its pivot is actually an eccentric. This makes it so when this arm is unlatched it will slip back and "permanenty" disengage from locking the film advance barrel.. Once it is out of the groove on the film advance mechanism barrel, the wind knob is freed to rotate, advance the film, and cock the shutter. All it takes is a very slight jar or bump for this arm to slip back into its groove, locking the film advance knob again. The resolution to this is simple. Push the shutter release. This releases the advance barrel again and hurts nothing. An attempt to force the knob could break off the end of this arm. The repair of this break is very very hard work.

Thanks for keeping with me this far. There will be more as the rebuild of this shutter proceeds.
The Rangefinder:
The Contax rangefinder is a miracle of precision. There are no adjustments. The only way to have it right is to put it together right. The adjustment requires removal of the front lens mount and movenent of the lens mount helical.
Every Contax camera I have seen has the same problem. This is that the adhesive holding the moving cylinder lens that produces the moving secondary image has failed. The result of this is that the rangefinder appears to function, but it is not accurate. The following pictures illustrate this problem.

This picture shows the failed adhesive. It is the two yellow tabs to the left and right of the cylinder lens bezel. The lower half of each side has broken off and fell out when the outer bezel was removed. The adhesive is shellac based, so it deteriorates and hardens with time. It becomes brittle and separates from the mount and the lens surface. This leaves the lens free to shift from right or left when the camera is shaken or moved. You can see the surface of the lens. It is the wedge shaped reflection in the center left of the bezel. Its lower curvature is to the left of the lower left side of the bezel.
This is a top view of the cylinder lens assembly. Behind the bezel is visible the top clip of the cylinder lens frame. There are top and bottom clips so the lens can only move from side-to-side when the adhesive becomes loose. The lens bezel is pointing to the left because the focus mechanism has been untensioned by disconnection of the cylinder lens table spring. Behind the rear surface of the cylinder lens can be seen the end of the rangefinder prism.
True rangefinder accuracy depends upon the cylinder lens being re-centered and re-cemented into its frame. Modern optical cement is used. It will hold the lens in alignment for many years. The rangfinder service includes cylinder lens recementing and alignment. Also it includes complete removal of all rangefinder and lens focusing parts, ultrasonic cleaning and relubrication with modern synthetic lubricants. The result is a silky smooth, feather light but positive focusing action.
Should the Shutter Speed be Set Before or After the Shutter is Cocked?
The simple answer is always set the shutter speed after the shutter is cocked.
The reason for this is that even though the wind knob is lifted and disengaged from the film advance mechanism when the shutter speed is changed, and the film will not advance; the gearing to the uppper shutter curtain will move. This movement will be restrained by the fact the upper and lower curtains are latched to each other. It is only when the shutter is fully cocked, and the upper shutter curtain barrel is fully free to rotate, that there will be full freedom of movement of the shutter speed selector dial.
Should the Camera be Stored with the Shutter Cocked or Released?
Always store the camera with the shutter released.
The reason for this is that one never knows exactly how long a camera will remain in storage once it is put away. For all you know, when you put your Contax II on the shelf, it may be your unborn grandchild who will pick it up next. This has already happened many times before. The fine springs in the Contax will definitely take a set and loose their strength if left tensioned for a number of years.
