Zeiss Ikon Contax Camera Repair
A home for your Zeiss Ikon Contax, Contarex or Super Ikonta camera!
Body:
- What Condition is Your Camera In Now?
- What is the Contax?
- Contax Shutter Accuracy in a Camera Today?
- What is Shutter Bounce or Blanking?
- What is the Difference Between a Black Dial and a Color Dial Camera?
- Can a Black Dial Camera be Converted to a Color Dial Camera?
- Can Anything be Done for a Gouged Eyepiece Bezel?
- Why is Zeiss Chrome so Bad?
- Can Anthing be Done for Bad Paint?
- Can I have a Camera Custom Built?
- How Should I Care for My Contax?
- The Illustrated Camera
- Why is Zeiss Chrome so Bad?
Rangefinder:
- The Rangefinder Wheel is Hard to Operate, What is the Cause of This?
- The Focusing Helical Seems to Have a Lot of Clearance, is This Normal?
- Why don't the images in my viewfinder and rangefinder line up right?
- The rangefinder image is badly faded, can it be restored?
- My Pictures are Fuzzy. Is it the Lens or the Rangefinder?
- There is a Defect in the Rangefinder Image, Can this be Corrected?
Shutter:
- Pictures of a Shutter Disassembly
- Pictures of a Shutter Assembly
- Why Does the Color Dial Model Shutter Not Release Sometimes?
- What are Shutter Tapes?
- What is Shutter Capping?
- What is Shutter Bounce?
- My shutter appears bent, what causes this?
- Shutter Cocking and Film Advance
- How do you clear a Jammed Camera?
- Why Does the Self Timer Interfere with 1/1250 Speed?
- How are Shutter speeds set on a IIa or IIIa camera?
Lightmeter:
- The IIIa Lightmeter Explained
- My IIIa LIghtmeter Doesn't Respond to Light At All, Can This be Repaired?
- The Needle on My IIIa LIgtmeter Sticks, Can this be Repaired?
- The Response of My Lightmeter to Light is Intermittent, Can this be Repaired?
- Can the IIIa Lightmeter Photocell be Rejuvinated?
Lenses In General:
- How Should a Lens be Cleaned?
- What Can be Done for a Filter Ring Dent?
- What is an Opton Lens?
- What is a Red "T" Coating?
- What is the difference between a Zeiss Opton and a Carl Zeiss Lens?
- Why are there Bubbles in the lens elements in my lens?
- What is Lens Fungus and What Can be Done About it?
- There is Oil on the Aperture Blades, is this Important?
- Can a Badly Scratched Front Element Surface be Repolished?
- What is Lens Element Separation or Cement Failure and What Can be Done about it?
- Can Nikon Lenses for the Nikon Rangefinder Cameras be Used on Contax Cameras?
- Can Jupiter Lenses for the Russian Rangefinder Cameras be Used on Contax Cameras?
- The 85mm f4.0 Sonnar
Leather:
- Where Can A New Camera Case Be Found?
- What are Zeiss Bumps?
- Can Zeiss Bumps Be Removed?
- Can Damaged Original Leather Be Replaced?
- "Zeiss Bump" Removal from Leather
Emergency:
Overhauling A Contax IIA/IIIA - Shutter

A Zeiss Contax Technician's Contax Parts Stash
I was recently lucky enough to be able to purchase the final inventory of Contax IIa/IIIa repair parts from the last technician who worked at the Canadian Zeiss Ikon official repair shop, Mr. John Bock to whom I shall always be indebted for his kindness in making these parts available. In this trove was this small technician's parts stash box. It contains many small Contax I, II, III and IIa/IIIa parts that would have been used at the bench as the need arose without having to go through the hassle and paperwork of going to the official inventory. It's a simple little thing, yet a thing of great beauty to those of us who love these cameras. If you want to see what's inside, just click on the picture to download a high resolution jpeg (1MB) of the contents. I'm going to keep it at my workbench, just as it is. It is a sacred thing and a priceless memento and reminder of very happy days gone by.
If you would like to see a high resolution picture of the contents just use this link to download the 1MB jpeg:

This is the first advertisment for the New Contax IIa camera. It was published in 1950.
Taking The Shutter Apart:
The Contax IIa and IIIa cameras must be completely disassembled in order for the shutter to be completely serviced. This is the way Zeiss designed the camera. It is exacting and precise work. In the rest of this document you will see many pictures of the camera and shutter being disassembled for a servicing. What is in these pictures is not special. Each and every camera serviced by me is given the complete treatment it needs so that it will work right each and every time for many years.
Shutter Assembly:
The Contax IIa and IIIa shutter has several mechanisms that require adjustment. Unlike all previous designs, the more modern IIa and IIIa shutter design incorporates the ability to adjust the high, medium and low speeds separately. This provides for the greatest possible linear range. However, wear and abuse may limit the ability of a shutter to be adjusted to the original factory specifications.
Shutter Tapes:
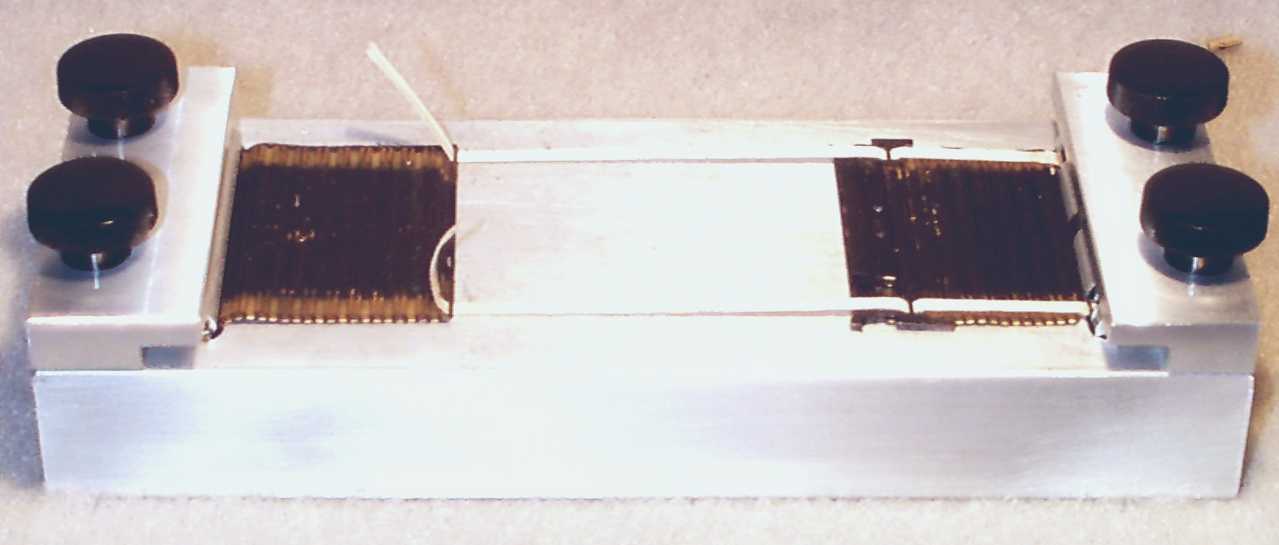
The original shutter tapes were made to explicit design criteria for Zeiss. The tapes used during a modern rebuild are the silk tapes. They have a specific weave and dimensions. These are not available today. Substitute material is used by many people. Many people use rayon ribbon obtained from craft supply houses. There are three problems with this tape. The size is usually incorrect, the material stretches under tension, and it is not durable. Only silk provides the required durability and resistance to stretching under tension. Only the required dimensions result in the proper friction when the tape slides through its slots in the upper shutter curtain. I use new silk shutter tapes made to the same specifications as the original. I am sorry to have to say I cannot sell any. The supply is sufficient only for my needs. The following picture is of a special tool used to set the shutter tape length:

This fixture ensures that the shutter curtain edges will be absolutely parallel during exposure. It also demonstrates that to repair Contax cameras, one must be able to afford, or to make all of the special tools required to ensure the job is done right the first time. Tool design is a separate specialty and requires some time since none are available to copy.
Color Dial Model Shutter Reluctance to Release:
The shutter release mechanism of the Color Dial Model IIa and IIIa cameras is much more complex than the one in the Black Dial model cameras. The Color Dial shutter release mechanism contains two electrical interlock switches that are part of the flash synchronization system. It also contains an additional shutter release interlock. All this additional complexity makes the mechanism more sensitive to the build up of wear products, roughness caused by surface oxidation, and gumming caused by the hardening of old grease. A Contax IIa or IIIa Color Dial model with a shutter that will not release reliably is one that needs a complete overhaul. This is the cure.
I recently overhauled a Contax IIIa color dial camera that had previously been sent to a very large and reputable camera repair shop. The owner had paid $200.00 for his camera to be serviced there. He sent his camera for servicing because the shutter was not releasing reliably. When he got his camera back after a three month wait nothing had changed. The camera shutter was still not releasing reliably. So he returned it under the guarantee (three months) and waited another three months and got it back in the same condition. The shutter would still not release reliably. Finally he sent it to me. When I disassembled the camera I found that the only thing that had been done to the camera for his $200.00 was that a single 0.005" thick washer had been placed underneath the shutter release button. This is about a ten minute job max. When the owner got his camera back from me two weeks later he took it on his lifetime trip to Paris and reported perfect operation and wonderful results.
When you get your camera back from me it will have been completely restored to it's highest possible potential and it will be reliable. It will have been completely overhauled. You will get more than $205.00 worth of work for your money.
Shutter Capping:
Shutter capping is a phenomena of the older Contax II and III cameras. The shutter curtains on the IIa and IIIa cameras do not latch together or cap. A built-in bias between the upper and lower shutter springs holds the curtains together as they are raised when the camera is wound.
Shutter Bounce:
In the very first production models of the Contax IIa and IIIa model cameras there was a problem observed with some cameras that the lower part of the film frame would not be exposed. It was discovered that the problem was caused by the lower shutter curtain hitting the inside of the camera body and bouncing back up a short distance. The solution to this problem was to cut a recess in the bottom of the camera case so that the parts of the lower shutter curtain that hit the case would have some clearance.
I have seen only one Contax IIa that had a hand modified case to account for shutter bounce. It didn't take Zeiss long to make a change to the camera body casting so that the necessary recesses were built in. I'm also sure that as cameras with shutter bounce problems came into the repair system their old bodies were replaced with newer once so that by today there are probably no cameras having this problem.
In more modern times the phenomena where the upper part of the film frame is unexposed has also been attributed to shutter bounce, but the correct name for this is "blanking". The cause of this problem is simply that the upper shutter curtain is traveling faster than the lower curtain and they meet before the lower curtain reaches the bottom. The cause of this speed mismatch is usually twofold. The first is general camera fouling caused by deterioration of the original lubricating grease and the second is excessive wear to the very complex, delicate and subtle shutter action control mechanisms. The only real remedy is a camera overhaul.
I have seen a great number of cameras that have this problem. Among these are a great number of cameras that were sent to other "experts" to have the problem corrected. In every case where the camera is sent to me after being repaired by another an entirely incorrect and highly damaging method has been used in an attempt to correct the problem. This method involves bending the moving arm that whose position is set by rotation of the film speed dial. The effect of bending this arm is actually to set the speeds lower than the dial indicates. For example: Suppose a camera is blanking at 1/500 and 1/1250, but it is not blanking at 1/250. The appearance that the problem is solved can be achieved by bending the speed control arm so that when the speed control dial is set at 1/1250 the camera internals are actually set at 1/250.
The problem with this approach is that it does nothing to correct the actual cause of the problem, it is deceptive, and the control arm has an extremely precise and subtle shape. It is extraordinarily difficult to get it back into the correct shape so that when the real cause of the problem has been corrected the arm will perform properly. This is a damaging technique that should never be used.
My shutter looks bent, what causes this?:
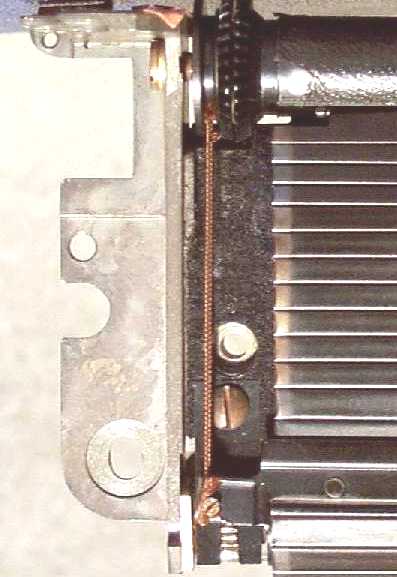
The shutter curtains do not cap and lock together as the shutter curtains in older Contax camera designs did. The position of the upper shutter curtain lip is held precisely in alignment with the lower shutter curtain lip by two cords on either side. The following picture shows the cord on the left side of the shutter.
The position of the shutter as shown in the picture is as it would be in the camera if you were looking at it through the lens mount.
The cords must be very precisely adjusted. If the cords are even a fraction of an inch longer than they should be, the upper shutter curtain lip will hang down too far into the camera body where the body cavity becomes smaller. This forces the shutter lip to bow outward making it look like it is bent. The shutter curtain stays bowed when it is cocked. So the shutter curtain appears to be bent. Correction of this problem is very tricky and difficult. The cord material cannot be replaced since there are no spare parts, and there is no satisfactory substitute. Removing it from where it has been glued into place, and then resetting it on both sides takes extreme care.

Right above the cord you can see two bevel gears. These gears operate to pull both shutter curtains up simultaneously, and allow the descent of each curtain to be controlled independently. This simultaneous lifting is what keeps the lips from separating and exposing the film while the shutter is being cocked. The shutter tape is not visible as it is covered by the edge of the shutter curtain.
Shutter Cocking and Film Advance:
The winding knob simultaneously winds the film advance and cocks the shutter. The design of the IIa and IIIa shutter is very different from that of previous cameras.
Clearing a Camera Jam:
The shutter release mechanism for the Black Dial model is much simpler than is the one in the Color Dial model so the Color Dial model is more susceptible to jamming. Jamming is caused because the shutter is cocked, but cannot be released, so the wind mechanism is locked. There is no way to clear a jam from outside the camera. A jammed camera is a camera that needs a complete service.
Never ever force the winding knob. Don't even think about it. All it will do is to break too many parts so that the camera cannot economically be repaired. There are no spare parts available so forcing the wind knob is good way to turn a good camera into a camera that is good only as a source of spare parts for other cameras.
Never shock the camera. Don't even think about it. Many rangefinder prisms have been split by cameras being hit hard in frustration. A broken prism can only be replaced by purchasing a parts camera with a good prism.
Why Does the Self Timer Interfere with 1/1250?
Most people use their cameras at 1/1250 very seldom if at all. And most people use the self timer very seldom if at all. So most people never come to experience a blank frame when the camera is set at 1/1250 and the self timer is used. When the self timer is set and the shutter release is depressed the shutter is released and moves a minute distance. The lower shutter curtain moves a slight amount and is then held by the self timer catch. When the timer runs to its completion the self timer catch is retracted and the lower shutter curtain is released. So, the self timer catch takes the place of the normal shutter release mechanism and the shutter components are slightly out of full cock alignment when the shutter is released by the self timer. The balance and alignment of the shutter components must be in very delicate and precise alignment at the point of release for the shutter to perform properly at 1/1250 speed. So it is normal for the frame to be blank if the camera is used with the self timer when the speed dial is set at 1/1250 if the camera has not been serviced in a long time or if was last give a typical "CLA" type service.
It is possible that you may take your camera and test it to find out if this behavior is happening with your camera. It is also possible that when you get your film back you will find the frame is exposed. If this is the case you have not proven your camera will work properly when the self timer is used to release the shutter at 1/1250. What you have demonstrated is that your shutter is considerably slower than 1/1250 when it is set at 1/1250. The reason for this is that it is a very common practice by most workers to deliberately reset the camera shutter speeds low to avoid shutter bounce. This is done to avoid the hard and complex work of completely disassembling the camera and cleaning and lubricating it and then properly adjusting it so that when the shutter speed dial is set at 1/1250 it actually exposes film at this speed. My experience with most cameras that I receive that have been "CLA'd" by others is that when the speed dial is set at 1/1250 the shutter is actually exposing at about 1/300.
Another thing to consider is that you cannot evaluate the behavior of a shutter using color negative film. The reason for this is that modern color negative film contains two separate layers having different speeds. An ISO 800 film will have an ISO 800 layer and also an ISO 200 layer. The reason manufacturers are doing this is to increase the yield of satisfactory pictures from film exposed by amateurs in simple cameras. Keep in mind that film makers make most of their profit from the film processing and not from the sale of film and cameras. With film having two layers with widely differing speeds it is more likely that the simple amateur camera will capture a printable image. This greatly increases the profit for the film manufacturer and also reinforces customer loyalty to a particular film brand. So if color negative film is used to test a Contax whose shutter is widely off its true speeds, it isn't possible to determine this from prints. They will all look good because the film is made to make a printable negative regardless of the shutter speed, and the processor is very expert in making good prints from bad negatives. If you want to know what your shutter is really doing you must use a narrow exposure latitude single layer film whose results cannot be manipulated during the print making process to evaluate your shutter. Kodachrome 25 is a good film for this purpose.
How are Shutter Speeds Set on the IIa and IIIa Cameras?
Setting a Contax IIa and IIIa shutter is much different procedure than is used for other focal plane shutter cameras. Leica type cameras have individual adjustments for the first and second shutter curtain springs. In the Contax both springs are attached to the same shaft and so there's one adjustment for both springs. The Contax IIa and IIIa shutter has six separate separate adjustment points. Four of these affect the speeds of 1/250 to 1/1250 and they interact with each other. The other two affect speeds of 1sec. to 1/100 sec. and B.
The proper procedure after a camera rebuild is to adjust 1/1250. Due to the fact this speed is adjusted by the manipulation of four interacting adjustment points it can be a complex procedure. It's time consuming because it's also necessary to wait some hours after each adjustment to ensure the adjustment has settled in before measuring the resulting shutter speed and moving on if necessary. In some cameras it can take as long as a week to get the fastest and most reliable high speed adjustment settings set properly. Each camera is different and requires its own special treatment to find out the exact settings necessary.
A big complicating factor in setting shutter speeds is that it is necessary to obtain the settings that result in the least necessary shutter spring tension. A lower tension results in increased shutter tape life, less inclination for the shutter springs to take a set, and it greatly increases the life of the shutter cords.
The Contax IIa/IIIa shutter has a set of two very small diameter cords that set the bottom stop for the lower shutter curtain. When the shutter is released the lower curtain drops and is stopped by these cords which unroll from spools. There is no modern replacement cord that works properly and so it is extremely important to set the shutter so that the tension on the shutter springs is as low as possible. In some cameras it takes a lot of time and adjusting to find out the optimum set of adjustments that result in the most accurate speed with the lowest possible spring tension settings.
The Contax IIa/IIIa shutter tape tends to fray if the shutter spring tension is set too high. Fraying causes it to develop fuzzy surface due to broken threads. When the upper curtain descends, the upper lip slides down on top of the shutter tape. If the tape is frayed the high shutter speeds cannot be set properly due to the increased friction between the tape and the curtain lip. This is another important reason to take great patience and care in the setting of the shutter to obtain the lowest possible shutter spring tension.
The Contax IIa/IIIa shutter has a problem in that it is very easy to mask underlying inner shutter mechanism friction problems by simply cranking up the shutter curtain tension. Many of the cameras I see that come here are suffering from shutter problems that have been caused by being used for too long with shutter springs that have been set at a tremendously excessive shutter spring tension.
It is possible to access the shutter spring tension adjustment without disassembling the camera. I have seen enough previously "serviced" cameras here to know that most servicing's or "CLA's" consist merely of ratcheting up the shutter spring tension to the point where the shutter appears to work properly to the eye, and the application of windex and shoe polish to the camera exterior.
